
The Cheapest Bug Fix Is the One You Make in a Plan
A plan costs a minute to read and nothing to throw away, so make Claude Code show its plan, save it as a committed spec, and prove with git that nothing else changed.

Claude Code plan mode lets you read every decision before a single line of code exists. One keypress at the approve dialog decides whether you keep that safety.
The sinking feeling of finding a design decision you never agreed to, buried in code that is already written.
In this article: Day 3 of a day-by-day guide to Claude Code. Start here: you get a plan from Claude in plan mode, read it, and save it as a committed spec with no change to your code. Going deeper: every way into and out of plan mode, the interview-to-spec workflow, and the task list.
Tested on Claude Code 2.1.326.
Yesterday you steered Claude while it worked, queued a follow-up, and rewound a change you did not want.
Start here
At the end of today, you can get a plan from Claude in plan mode, read it, and save it as a spec file in the repository, with no change to your code.
Starting fresh or fell behind? Run git switch -C main claude-code/day-02. This replaces your main with the end of Day 2; to keep your own work, run git branch my-backup first.
For a one-line fix, you give the task and check the result. A new function is different. It adds a file, it adds tests, and it makes small decisions that you may not agree with. A wrong decision is cheap to fix in a plan and expensive to fix in code. Today you ask for a plan first.
Two new terms:
- Plan mode is a permission mode. In plan mode, Claude reads files and writes a plan, but it does not change your code until you approve the plan. It can still save a document that you ask for, such as the plan itself.
- A spec is a short document that says what to build and how you will know it works. You commit it to the repository, next to the code it describes.
Today's feature is a new function for Ticket Triage. priority(text) returns "high" when a ticket mentions urgent, asap, or immediately, and "normal" otherwise. You do not build it today. You plan it and save the plan as docs/specs/priority.md.
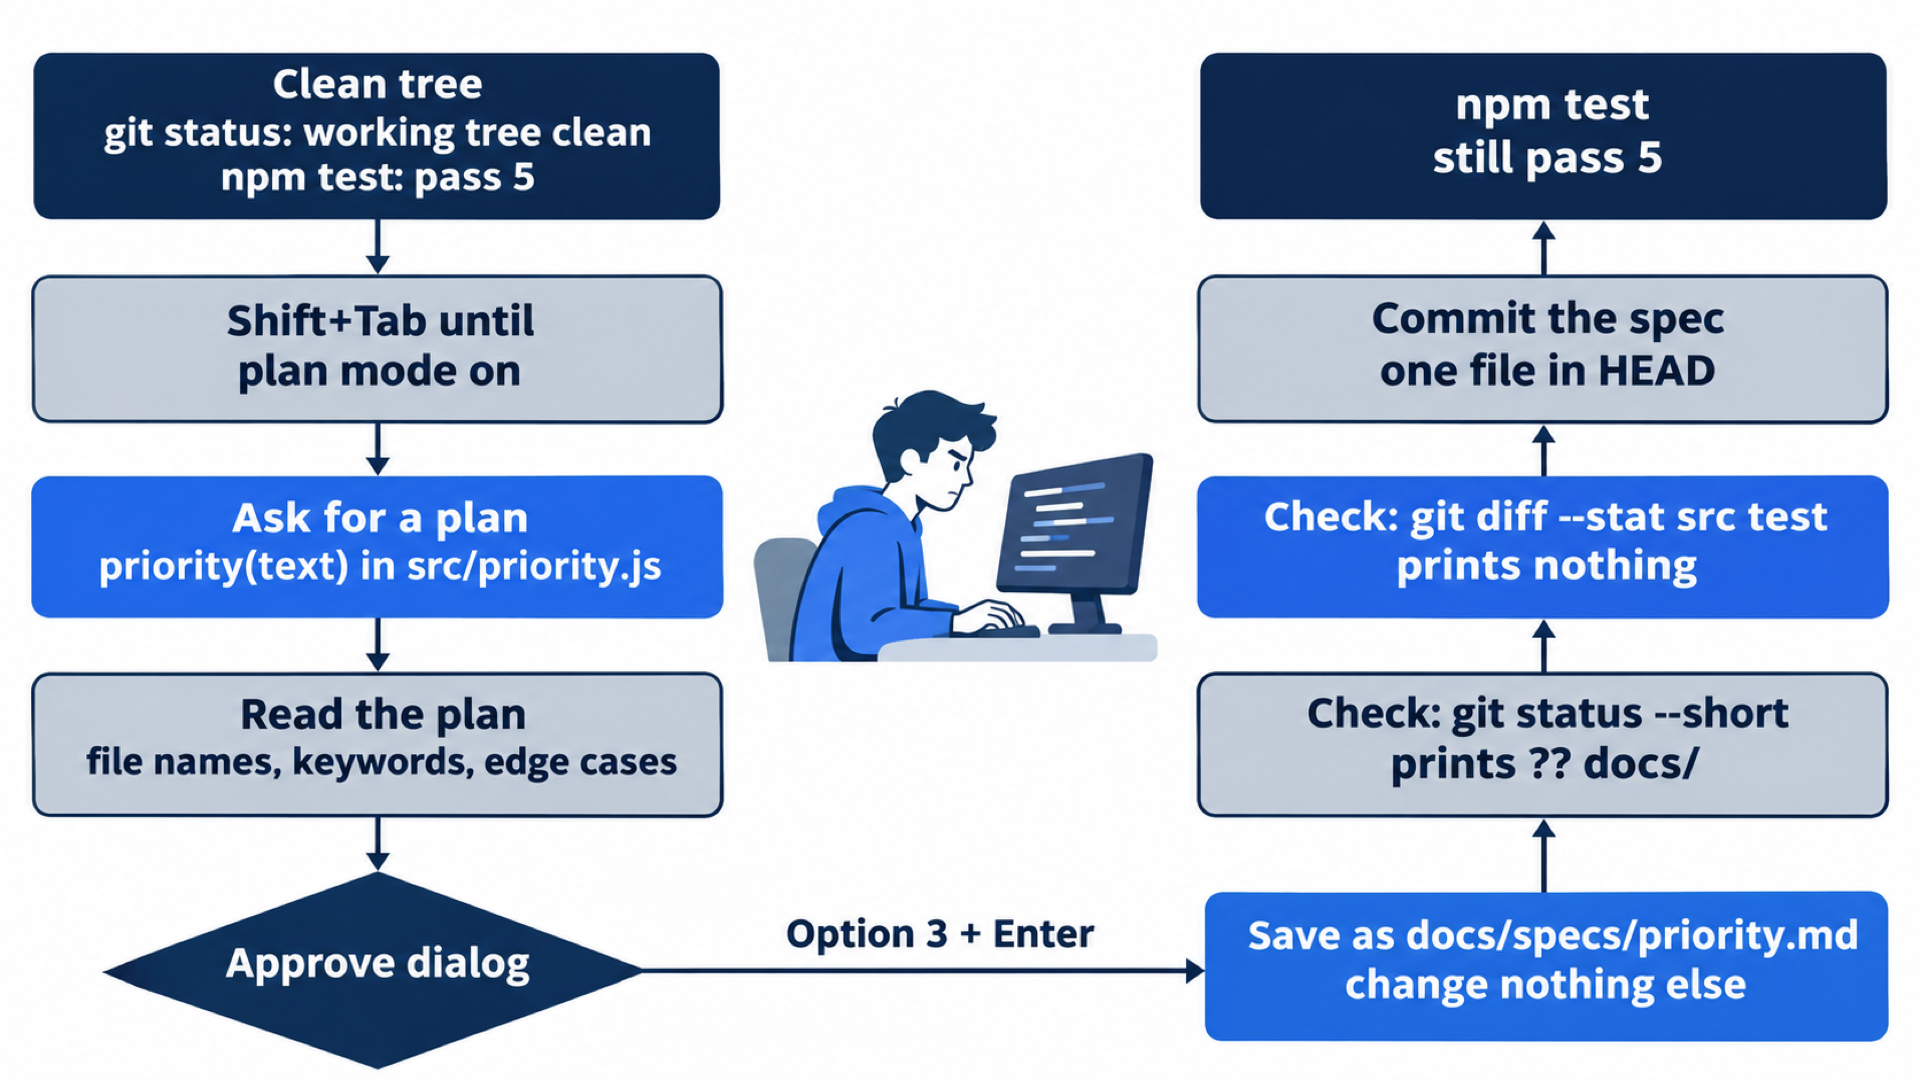
Start from a clean tree
Open a terminal in Ticket Triage and check the working tree:
cd ~/code/ticket-triage
git status
Git prints nothing to commit, working tree clean. A clean tree makes today's check simple: after Claude saves the spec, the spec must be the only new file. Then run npm test and look for ℹ pass 5 and ℹ fail 0, the count you wrote down at the end of Day 2.
Start Claude Code:
claude
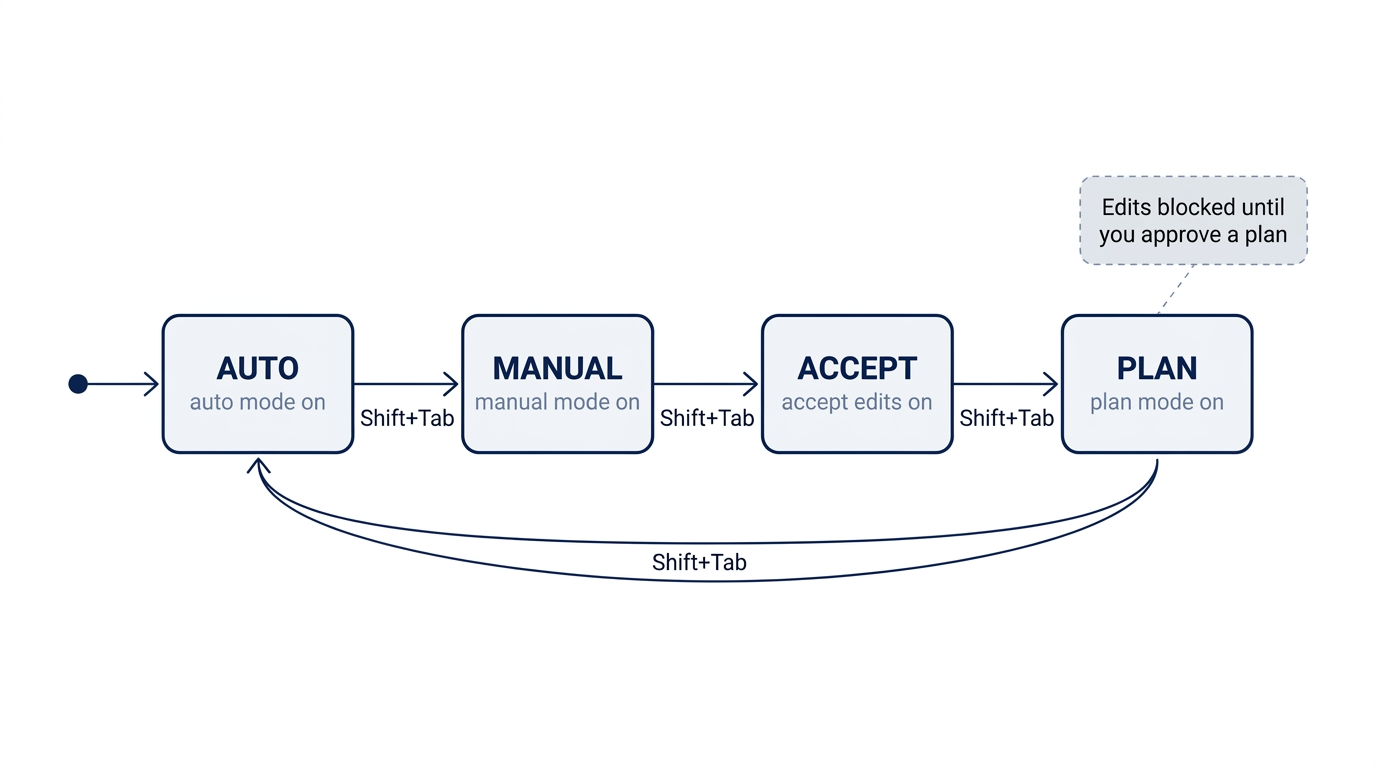
The status bar shows ⏵⏵ auto mode on (shift+tab to cycle). If it shows ⏸ manual mode on, keep it, and follow the Manual mode: lines below.
Switch to plan mode
Shift+Tab changes the permission mode, one step per press. Press it three times and watch the status bar. Manual mode: press it twice, through accept edits on. On Claude Code 2.1.326, the three presses showed:
⏸ manual mode on
⏵⏵ accept edits on (shift+tab to cycle)
⏸ plan mode on (shift+tab to cycle)
The first two are other permission modes. You do not need them today. Stop when the status bar says plan mode on.
Ask for the plan
Type this prompt and press Enter:
Plan a new function, priority(text), in src/priority.js. It returns "high"
when the ticket mentions urgent, asap, or immediately, and "normal"
otherwise. List the tests you would add and any edge cases. Do not write
any code yet.
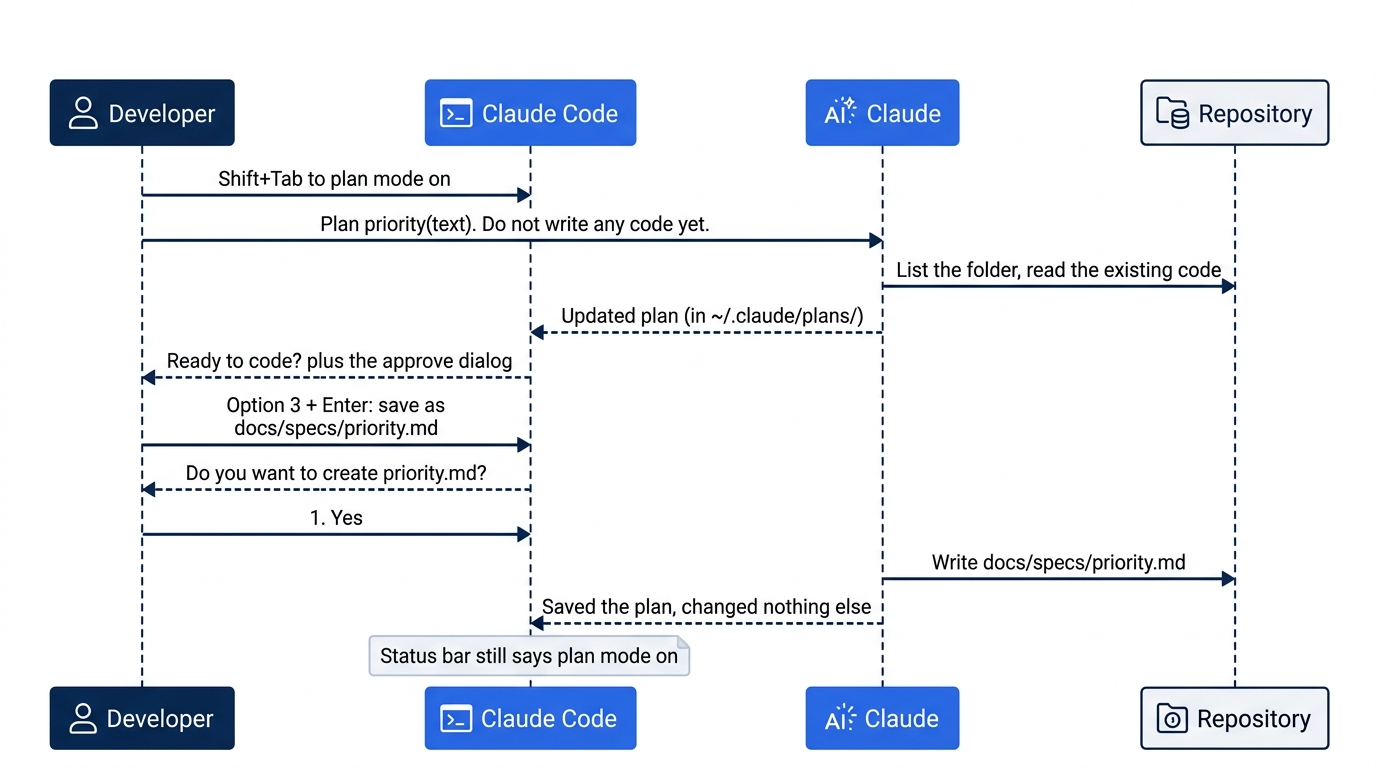
Claude reads the project. On the tested run, it listed the folder, read the existing code, and then showed Updated plan. Claude writes its plan to a plan file of its own, not to your project.
Read the plan
When the plan is ready, Claude Code shows it in a box under the heading Ready to code? and Here is Claude's plan:. On the tested runs, the plan had these parts:
- Approach. A new file
src/priority.jsthat lowercases the text and checks the three keywords withincludes, the same wayclassify()works. No change toclassify.js. - Tests. A new file
test/priority.test.js, with 7 to 9 tests: one per keyword, tests for capital letters, a test for "urgently", a test with no keyword, and a test for an empty string. - Edge cases. "This is not urgent" contains "urgent", so it returns
"high". Claude chose to accept this as a known limit of keyword matching. - Verification. Run
npm test, and run the new test file on its own. - Sometimes, a CLAUDE.md change. Some plans also say to add a line about
src/priority.jsto CLAUDE.md.
Read the whole plan. Check three things:
- The file names are
src/priority.jsandtest/priority.test.js. - The keywords are urgent, asap, and immediately, and the default is
"normal". - You agree with each edge-case decision.
Your plan will use different words. The "not urgent" case is the kind of decision that a plan shows you before any code exists. The CLAUDE.md line is a change you did not ask for. Today's instruction in the next step keeps it out of the spec, so the spec holds only the function and its tests.
The approve dialog
Under the plan, Claude Code asks what to do next. On Claude Code 2.1.326, in auto mode and in Manual mode, the dialog was:
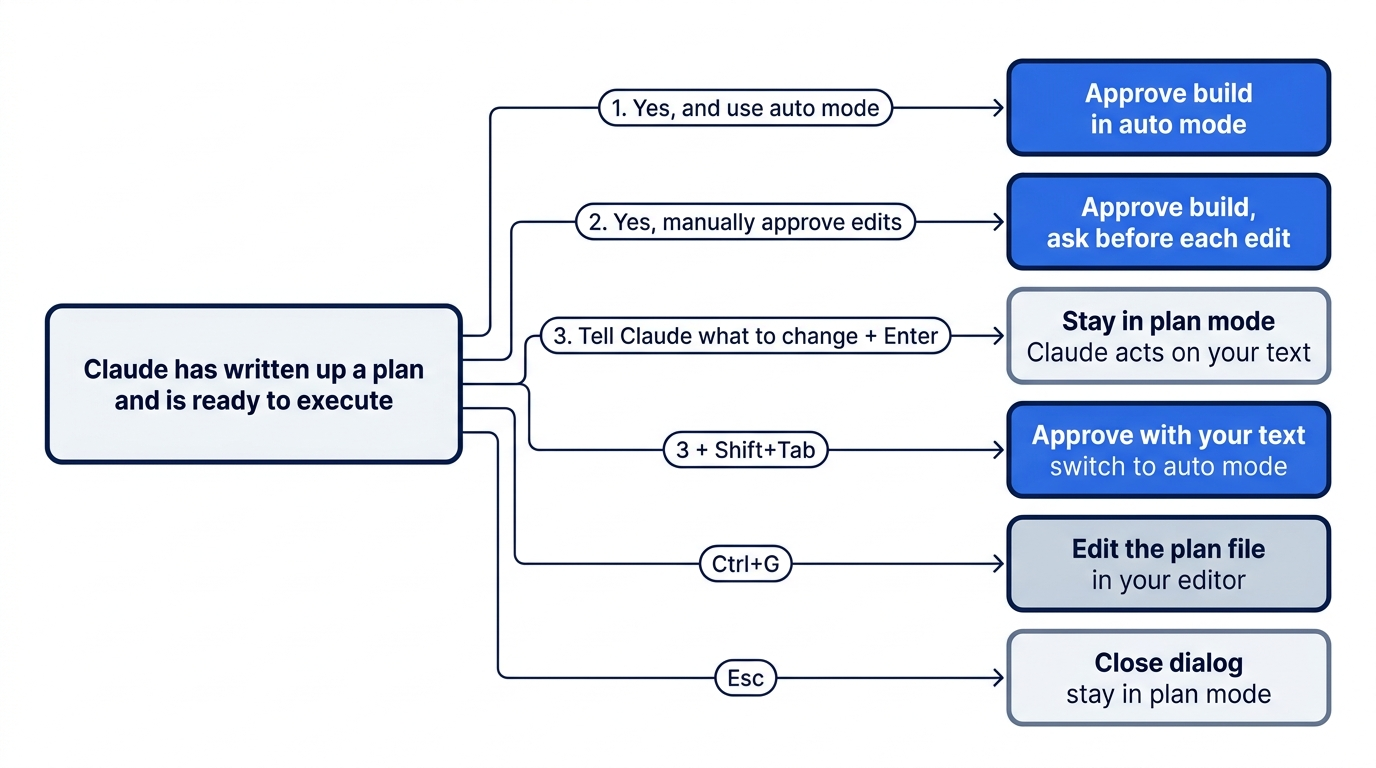
 Claude has written up a plan and is ready to execute. Would you like to proceed?
 ❯ 1. Yes, and use auto mode
   2. Yes, manually approve edits
   3. Tell Claude what to change
      shift+tab to approve with this feedback
 ctrl+g to edit in VS Code · ~/.claude/plans/plan-a-new-function-zany-wilkinson.md
- 1. Yes, and use auto mode approves the plan. Claude leaves plan mode and starts to write the code in auto mode.
- 2. Yes, manually approve edits also approves the plan and starts the code, but Claude asks you before each edit.
- 3. Tell Claude what to change keeps the session in plan mode. You type an instruction and Claude acts on it.
The last line names the plan file. Its ctrl+g hint opens that file in your editor. You do not need it today. The name is random, so yours differs.
Options 1 and 2 start the build. You do not want the build today, so use option 3.
Save the plan as a spec
Press the down arrow twice to select option 3. Then type this instruction. Your text replaces the words Tell Claude what to change on the option 3 line:
Do not implement this plan. Leave CLAUDE.md out of the spec. Save it as docs/specs/priority.md and change nothing else.
Press Enter. Do not press Shift+Tab here. At this dialog, Shift+Tab does not move to the next mode. It approves the plan, sends your text with it, and switches the session to auto mode. Claude then acts on the plan in auto mode, and only your wording keeps it from building.
Manual mode: Shift+Tab at this dialog switches the session to auto mode, even though you started in Manual mode. Press Enter to approve and stay in Manual mode. If auto mode is turned off for you, option 1 reads Yes, auto-accept edits, and Shift+Tab here switches to accept edits on. This guide tested that case with a project setting, not with an organization's managed settings.
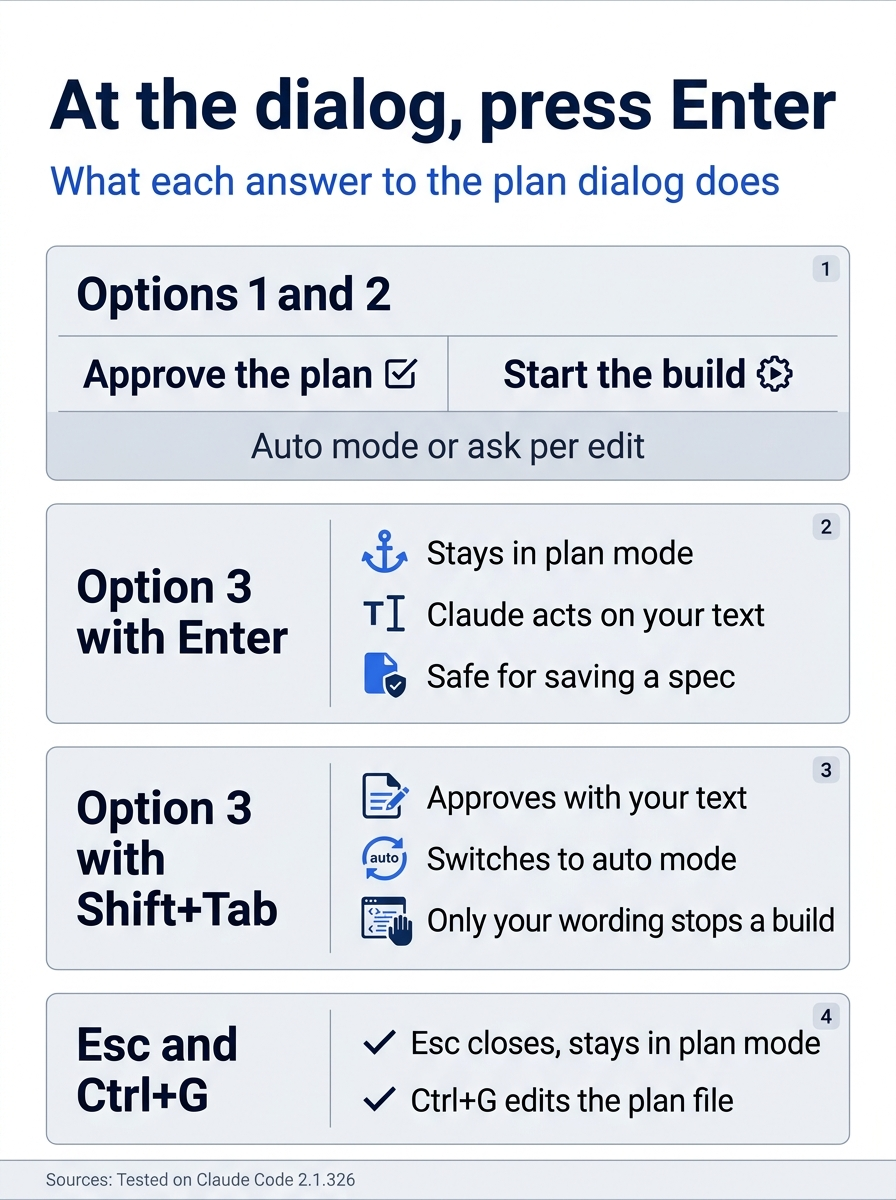
The dialog comes down to one rule: when you want a document and not a build, choose option 3 and press Enter, because every other approval path can start writing code.
Claude saves the plan to docs/specs/priority.md. In plan mode, Claude Code asks Do you want to create priority.md?, in auto mode and in Manual mode. Choose 1. Yes. If no question appears, go on to the check. On the tested run, Claude's reply was:
⏺ I saved the plan to docs/specs/priority.md and changed nothing else: no code,
  no tests, no CLAUDE.md edit, and no commit.
The status bar still says plan mode on.
Check the win
Do not take Claude's word for it. In a second terminal window, in the same folder, check that the spec exists:
ls docs/specs
The output is priority.md. Open the file in your editor. It holds the plan you read, with a title such as # Plan: `priority(text)` in `src/priority.js` .
Then check that nothing else changed:
git status --short
git diff --stat src test
git status --short prints one line:
?? docs/
The ?? means a new folder that git does not track yet. git diff --stat src test prints nothing, because no file in src/ or test/ changed. You need both commands: git diff does not show new files, so only git status would catch a new src/priority.js.
Commit the spec:
git add docs/specs/priority.md
git commit -m "Add priority spec"
git show --stat --oneline HEAD
The last command shows one file in the commit. On the tested run:
3f90fa6 Add priority spec
 docs/specs/priority.md | 40 ++++++++++++++++++++++++++++++++++++++++
 1 file changed, 40 insertions(+)
Your commit ID and line count differ. The check is that the commit holds exactly one file, docs/specs/priority.md. Run npm test one more time. You still see ℹ pass 5 and ℹ fail 0, because the code did not change.
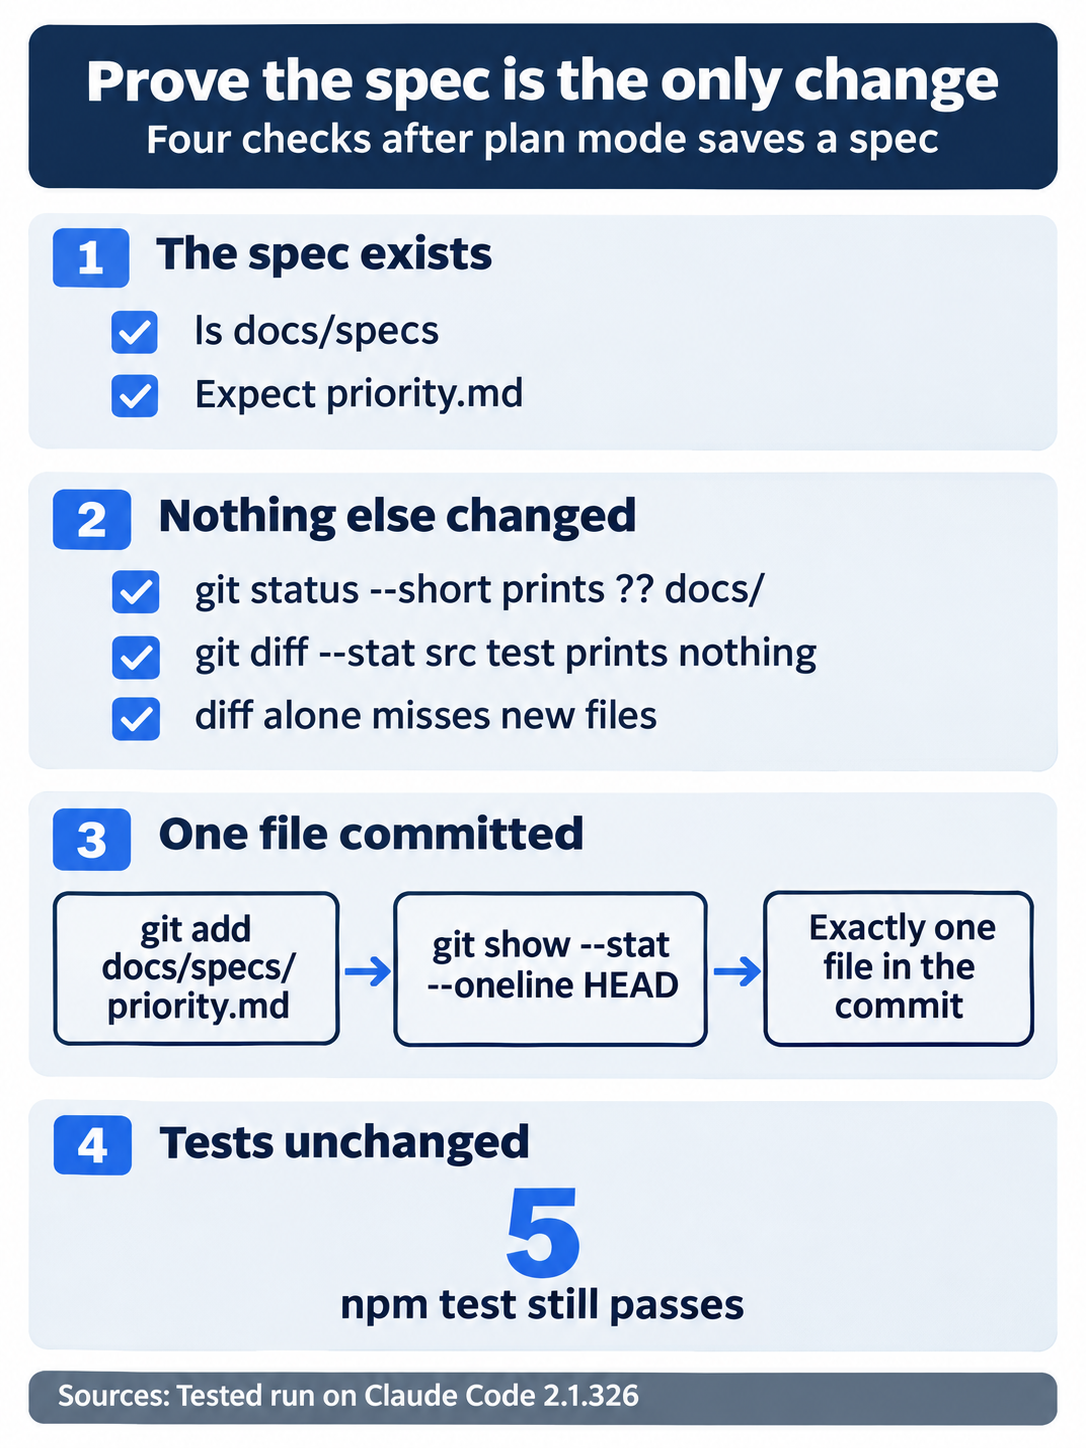
The check has four proofs, in order: the spec exists, git shows only the new docs/ folder, the commit holds one file, and the suite still reports 5 passes.
Go back to Claude Code and press Shift+Tab once. The status bar returns to auto mode on. Manual mode: press it twice, through auto mode on, to ⏸ manual mode on.
You planned a feature in plan mode, read the plan, and saved it as a committed spec. The src/ and test/ folders did not change. The pass count is still 5.
You can stop here. Going deeper explains why this works and where it breaks.
Going deeper
This section is for readers who want the rest of the planning toolkit: other ways into plan mode, every way out of it, the interview-to-spec workflow, the task list, and how a spec drives a longer run. It assumes you finished Start here in Parts 1 to 3.
What plan mode allows
Plan mode blocks edits to your files until you approve a plan. Shell commands are a different case. When auto mode is available to your session and the useAutoModeDuringPlan setting is on, which is the default, the auto mode safety check reviews each shell command in plan mode instead of asking you. In one tested run, Claude copied the plan file with cp, and Claude Code did not ask, because the safety check approved the command. Without auto mode, commands outside a built-in read-only set ask for approval. The permission modes page has the details.
The practical result: plan mode is not a hard read-only sandbox. It is a strong default plus a check. Your own check is the one in Start here: git status --short after the plan step.

The scene captures the moment the whole technique exists for: a developer spots a decision in the plan, such as "not urgent" returning "high", while changing it still costs a minute instead of a rewrite.
Three ways into plan mode
Shift+Tabuntil the status bar saysplan mode on, as in Start here./planbefore one prompt, for example/plan add a billing category. Claude Code switches to plan mode and starts on that task at once.claude --permission-mode planat launch.--permission-modesets the mode a session starts in.
To make plan mode the default for one project, set "defaultMode": "plan" in the project's .claude/settings.json. The VS Code extension ignores that file for the starting mode and uses its own claudeCode.initialPermissionMode setting.
Every way out of the approve dialog
Start here used option 3 with Enter. The other paths, as tested on 2.1.325 or as the docs state them:
- Option 1, Yes, and use auto mode. Approves the plan and switches to auto mode. If auto mode is not available to your session, for example because your organization turned it off, this option reads Yes, auto-accept edits instead.
- Option 2, Yes, manually approve edits. Approves the plan and switches to Manual mode, so Claude asks before each edit and each command.
- Option 3 with
Shift+Tab. Approves the plan with your typed text as extra instructions. On 2.1.326, in a session that started in Manual mode, it switched the session toauto mode on, and Claude saved only the spec. Withpermissions.disableAutoModeset to"disable"in the project's.claude/settings.json, it switched toaccept edits on. This guide did not test managed settings, where an organization sets it. On the first tested run, on 2.1.325, the same "save it asdocs/specs/priority.md" text withShift+Tabswitched the session to auto mode, and Claude saved the spec and changed nothing else. It works, but nothing stops Claude from starting the build in auto mode if your instruction is unclear. UseEnteruntil you trust your wording. Esc. Closes the dialog and stays in plan mode. PressEscfirst if you want to leave plan mode without approving, thenShift+Tab. At the dialog itself,Shift+Tabapproves the plan.Ctrl+G. Opens the plan file in your default text editor. The tested footer saidctrl+g to edit in VS Code, because VS Code was the default editor on that machine. Strike out what you disagree with, add what is missing, save, and close. Claude proceeds with your edited plan. This is the fastest way to turn "Claude proposed something" into "we agreed on something."
Approving a plan also names the session after the plan, unless you named it already. In testing, Claude Code renamed the approved run add-priority-function. The showClearContextOnPlanAccept setting adds a first option that approves the plan and clears the planning conversation, so the build starts with a clean context window.
Plan files live in ~/.claude/plans/, one per plan, with a generated name. Set plansDirectory in your settings to keep them somewhere else.
Version notes. The first edition of this guide listed four options named "Approve and start in auto mode", "Approve and accept edits", "Approve and review each edit manually", and "Keep planning with feedback". Those labels changed. Older versions also offered a "refine with Ultraplan" path; Ultraplan was removed in v2.1.222, and the commands reference now says "Use plan mode instead."
Plan with Opus, build with Sonnet
The opusplan model alias uses Opus while the session is in plan mode, then switches to Sonnet when you approve the plan. Set it with /model opusplan. Opus 5.5 is already the default model, so opusplan does not give you a stronger planner. It gives you a cheaper builder. On Bedrock, Vertex, and Foundry, the aliases can point to older models. See model configuration.
Interview-to-spec, for features you have not thought through
Start here used plan mode because the feature was already clear: three keywords and a default. When the goal is fuzzy, ask Claude to interview you first. Anthropic's best-practices page suggests this prompt:
I want to add rate limiting to the public API but haven't thought it through yet.
Interview me until you could write the spec, then write it to SPEC.md.
Claude asks you multiple-choice questions with the AskUserQuestion tool, a built-in tool that shows a question with options and an "Other" row for your own answer. The questions go after the parts you have not decided: per-user or per-key limits, what happens to a request over the limit, and what is out of scope. When the answers add up to a spec, Claude writes the file. This workflow was not part of this guide's test run.
The first edition used a longer prompt that asked Claude to "dig into the hard parts I might not have considered" and to cover "technical implementation, UI/UX, edge cases, concerns, and tradeoffs." Both forms work. The longer one gives Claude more direction about which questions to ask.
Then do the step most people skip: start a fresh session to build from the spec. Run /clear, or close Claude Code and start it again. The interview conversation is full of options you considered and dropped. The history helps Claude write the spec. It gets in the way when Claude builds. A fresh session that reads the committed spec from disk starts with a clean context window and a written definition of done.
Where to put specs:
SPEC.mdat the repository root for a one-off feature.docs/specs/<feature>.mdonce you have more than one or two. This guide usesdocs/specs/from the start, so Ticket Triage never has to move a file.
A spec from this workflow usually has a problem statement, goals and non-goals, the approach, alternatives with the reason each was rejected, acceptance criteria, and open questions. If your team has a template, name it in the prompt: "write the spec to docs/specs/oauth.md in the format of docs/specs/_template.md."
When to use which: plan mode is for "I know roughly what I want, propose it." Interview-to-spec is for "I have a goal, help me think it through." The question is whether the design is mostly settled or mostly open.
The task list, and why yours is probably empty
On Opus 5.5, the default model, the task list is off. The task-tracking tools (TaskCreate, TaskGet, TaskList, and TaskUpdate) are on by default only on Opus 4.7, Sonnet 4.6, Haiku 4.5, and earlier models. On newer models, Claude tracks multi-step work without a written checklist, and the list stays empty. To turn the tools on, use one of these:
# Turn the task tools on for this session, on any model
CLAUDE_CODE_ENABLE_TODO_TOOLS=1 claude

# Or name one of the tools in --allowedTools
claude --allowedTools TaskCreate
The default set has applied since v2.1.268. Background sessions and cloud sessions get the tools on every model. See task tool availability. The task list and everything built on it in this section and the next were not part of this guide's test run.
When the tools are on, the task list is Claude's checklist for the current job: items with pending, in-progress, and done markers. Claude creates items when a request needs several steps or when you give it a list. Then:
Ctrl+Ttoggles the task list view, which shows up to five tasks. When the list is empty, the toggle has no visible effect, which is why it looks broken on Opus 5.5.- To see every task, or to clear them, ask: "show me all tasks" or "clear all tasks."
- Tasks survive context compaction, when Claude Code summarizes an old conversation to make room.
- Each session has its own list. To share one list across sessions, start each session with the same ID:
CLAUDE_CODE_TASK_LIST_ID=priority claude. The list lives in~/.claude/tasks/priority/.
TodoWrite is the older single-tool form of the same checklist. It is off in favor of the four Task tools. In sessions that have the tools, CLAUDE_CODE_ENABLE_TASKS=0 brings TodoWrite back. The first edition dated the switch to "v2.1.142", but that changelog entry does not mention it. The changelog adds CLAUDE_CODE_ENABLE_TASKS in v2.1.19, "to keep the old system temporarily", which puts the switch at v2.1.19.
Do not commit the task list. It is working state for your own sessions, not a project file.
Keep the task list on disk
The task list lives in the session, so it is gone when the session ends. A small skill and a hook can copy it into committed files after every turn, so the plan survives across sessions and teammates. Day 11 builds that copy, after skills and hooks have their own days.
From a spec to a long run
A committed spec with acceptance criteria is a definition of done. /goal uses one. It sets a completion condition, and after each turn a model checks whether the condition holds. If it does not, Claude starts another turn instead of waiting for you:
/goal implement the spec in docs/specs/priority.md until all acceptance
criteria hold and npm test passes
Run it in a fresh session, in auto mode, so tool calls do not wait for approval. The goal clears when the condition holds, when the model judges it impossible, or when you run /goal clear. You can watch the run from your phone with Remote Control, which Day 7 sets up. Day 18 covers /goal in full. This flow was not part of this guide's test run. Do not run it in Ticket Triage this week, because Day 4 builds priority() from this spec step by step.
A spec with acceptance criteria is something a program can check: each criterion holds after the run, or it does not. A check that a program can run is what lets Claude work without you watching. Day 26 chains such checks into a larger flow.
Tracking work across weeks and teammates
- Commit the spec. Teammates can read it, comment on it, and change it in a pull request. Six months later, it answers "why does the code look like this?"
- For a team on a tracker such as Linear, GitHub Issues, or Jira, connect Claude to the tracker through an MCP server, a program that gives Claude extra tools, instead of a file in the repository. Claude reads issues, moves them, and posts results back. Solo projects do fine with a committed file.
- A ledger for loops. A committed task file, such as the one Day 11 builds, can also serve as a ledger. A script that reruns Claude can read it on the next run to see which tasks passed, which failed, and why.
- Agent view, opened with
claude agents, shows every background Claude Code session on your machine: what is running, what needs your input, and what is done. It is in research preview, so its screens and keys may change.
If you came from Get Stuff Done or Superpowers
Get Stuff Done (GSD) and Superpowers are community add-ons for Claude Code. Each adds its own commands for planning, specs, and task tracking. If you used one, you may look for the same features here. Claude Code ships them as four separate layers, and each does one job:
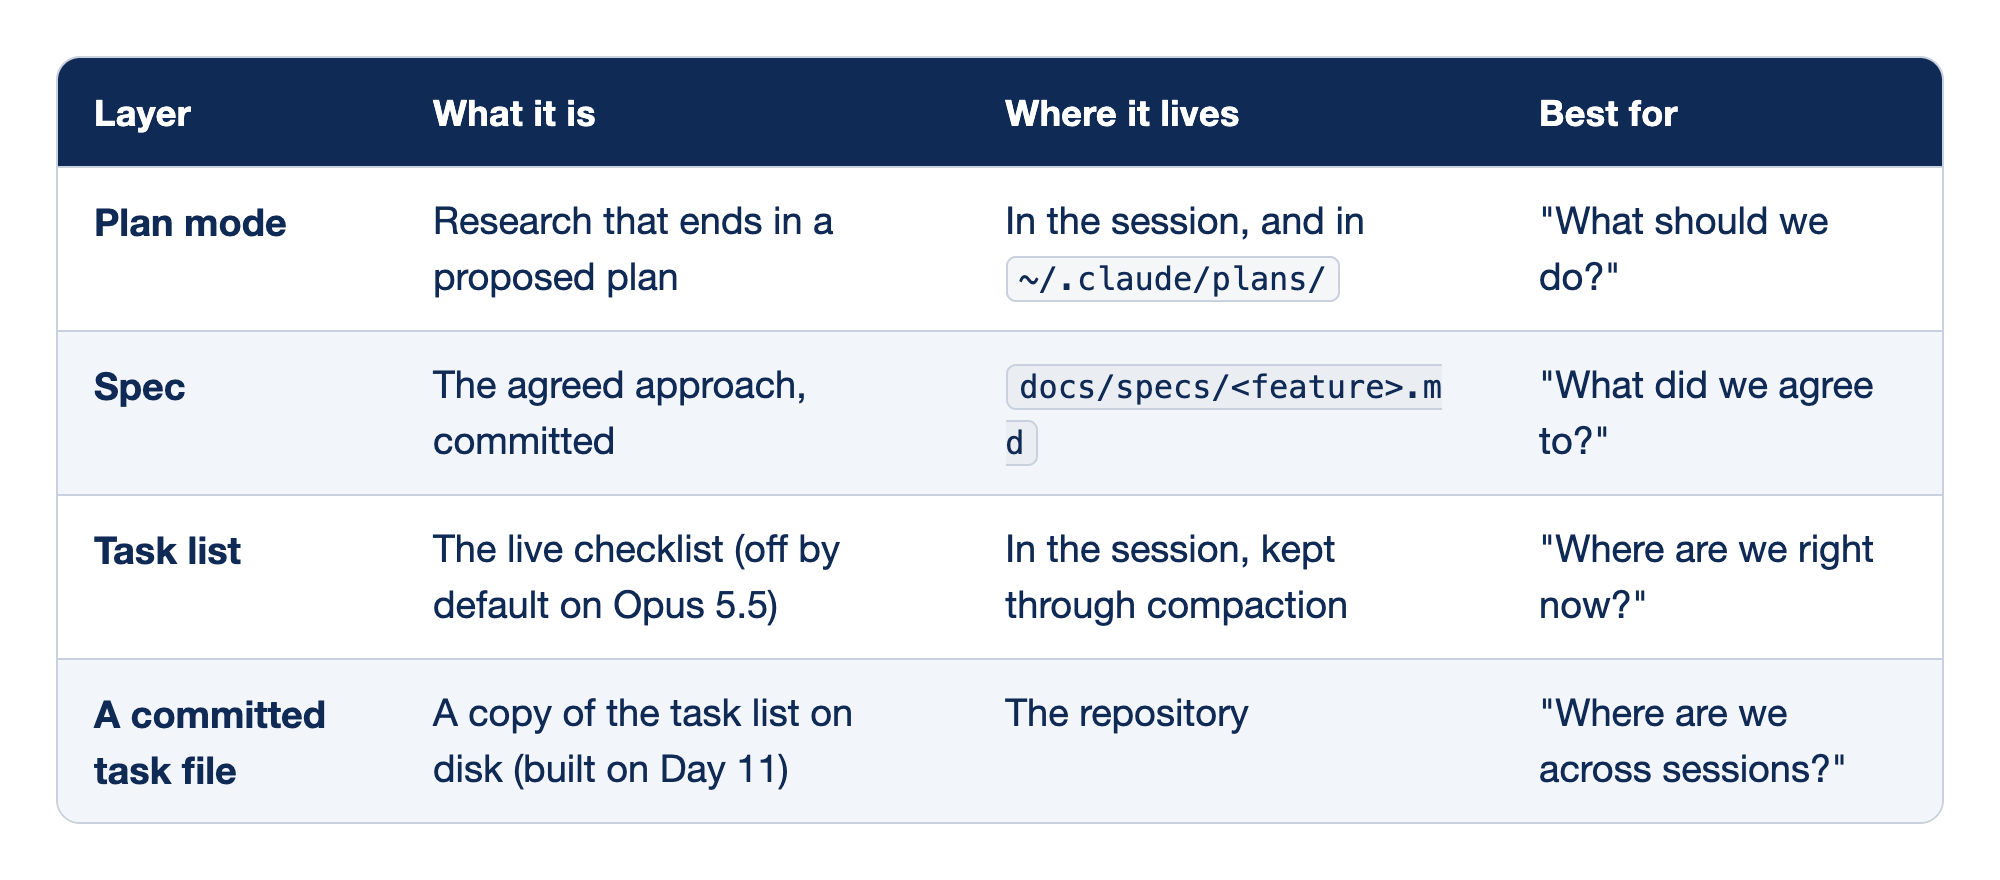
The four layers differ in what each one is, where it lives, and the question it is best for.
- Plan mode is research that ends in a proposed plan, lives in the session and in
~/.claude/plans/, and is best for "What should we do?" - A spec is the agreed approach, committed at
docs/specs/<feature>.md, and is best for "What did we agree to?" - The task list is the live checklist, off by default on Opus 5.5, kept in the session through compaction, and best for "Where are we right now?"
- A committed task file is a copy of the task list on disk, built on Day 11, kept in the repository, and best for "Where are we across sessions?"
Plan mode is fast but lives in the session. A spec lasts but does not change by itself. The task list is live but belongs to one session. A committed task file lasts across sessions but needs a sync. Use each for its own job. Most planning trouble comes from asking one layer to do all four.
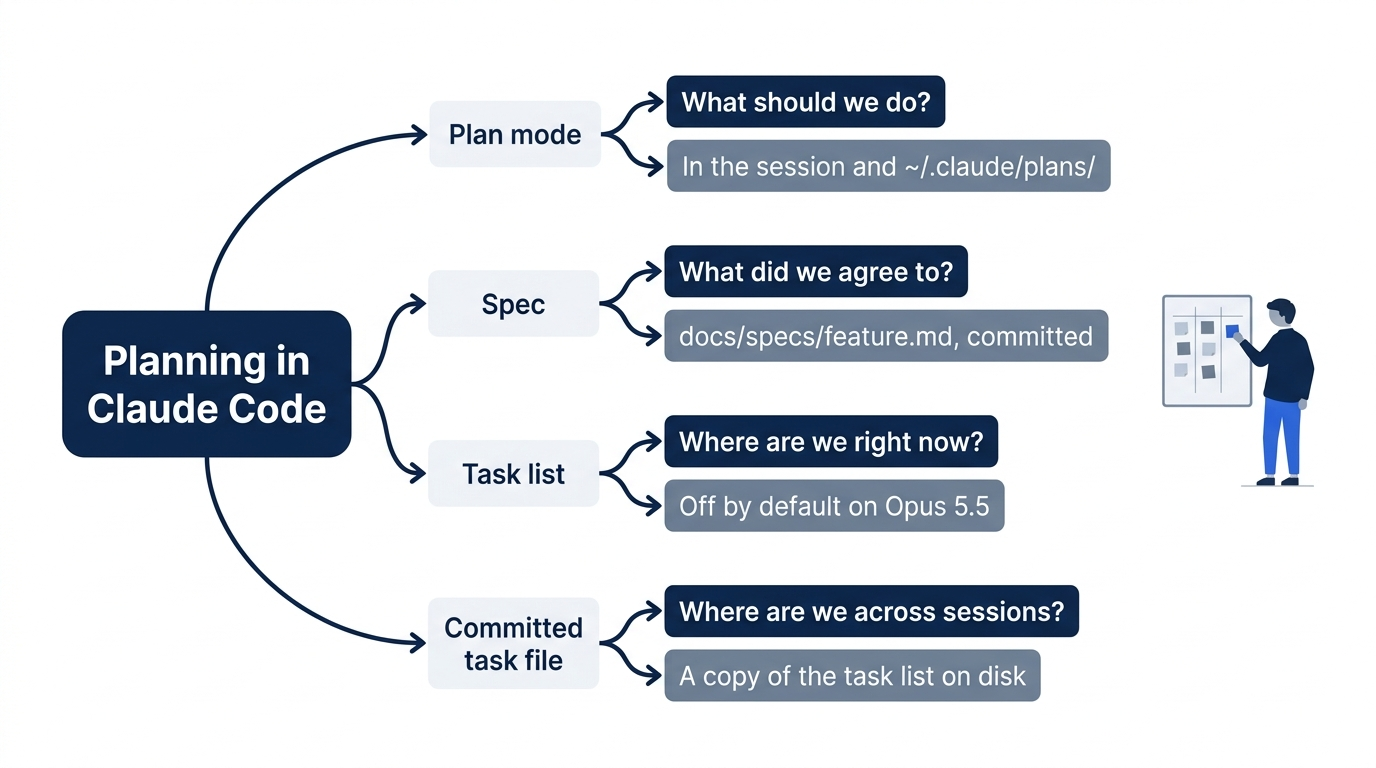
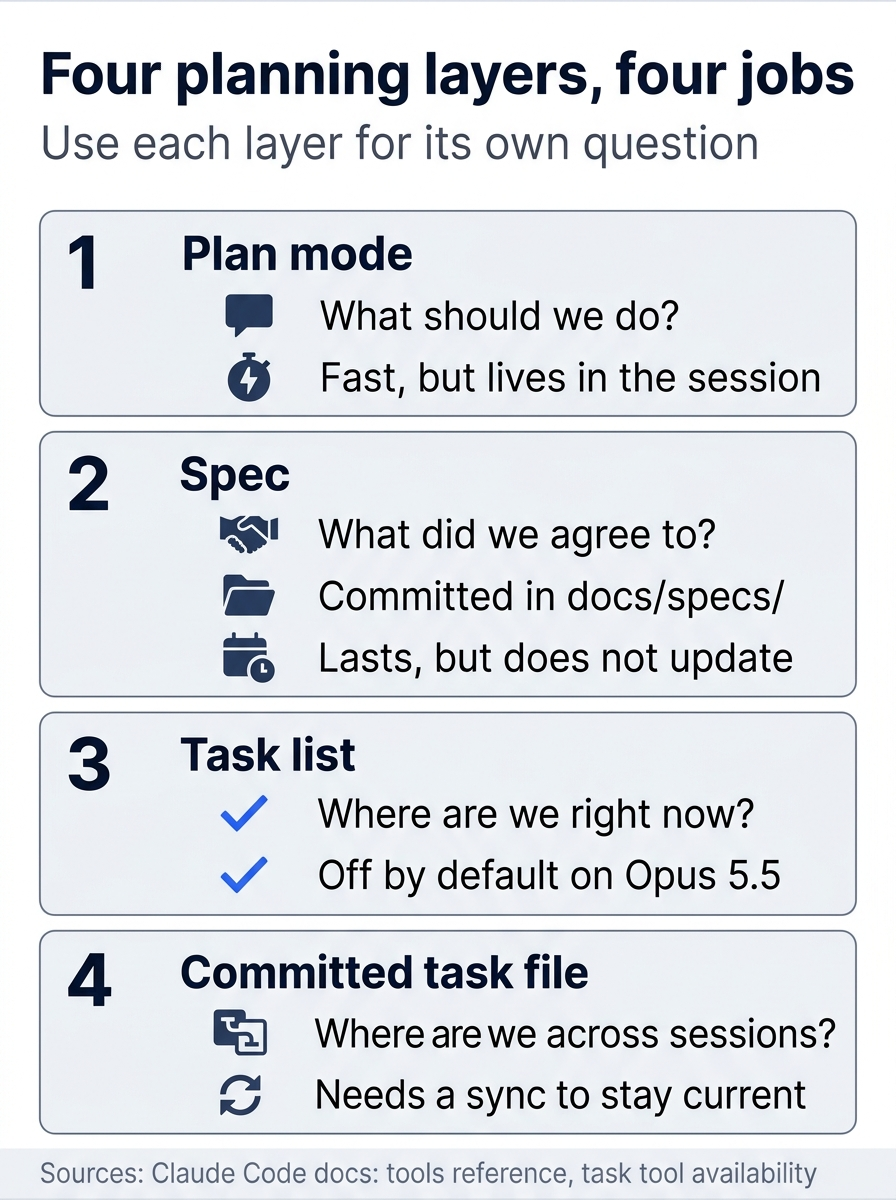
Each layer answers one question and has one limit, so you can pick the right layer for the question in front of you.
Go further: Why Your AI Coding Sessions Fall Apart at Hour Three (and the Workflow That Fixes It) walks through the first edition's four planning layers, including the skill and hook that keep a task list on disk. It was written before this edition's tests, so it still shows the old plan-dialog labels, dates the Task tools to v2.1.142, and has the task list on by default.
Do this today
Everyone
- Plan
priority()in plan mode and save the plan asdocs/specs/priority.md. Check the win:git show --stat --oneline HEADshows one file,docs/specs/priority.md,git status --shortprints nothing, andnpm teststill showsℹ pass 5. - Habit: before any change that adds a file or a function, press
Shift+Tabtoplan mode onand read the plan before you approve it.
If you read Going deeper
- Start a plan with
/planinstead ofShift+Tab:/plan add a billing category for tickets that mention invoice or charge. Check: the status bar showsplan mode onwithout aShift+Tabpress. Reset: at the dialog, pressEsc, then pressShift+Tabuntil the status bar shows the mode your session started in. Check thatgit status --shortprints nothing. - At the next approve dialog, press
Ctrl+G, change one line of the plan, and save. Check: the plan file named in the dialog's last line has your change. Reset: pressEscto close the dialog without approval, then pressShift+Tabuntil the status bar shows your starting mode. The plan file is outside the project, sogit status --shortprints nothing. - Start a session with
CLAUDE_CODE_ENABLE_TODO_TOOLS=1 claudeand ask for a three-step task in plan mode. PressCtrl+T. Check: the task list shows the steps. Reset: pressEscat the approve dialog, then type/exit. Check thatgit status --shortprints nothing. - Run the interview prompt for a small Ticket Triage feature and have Claude write
docs/specs/<feature>.md. Check: the file exists and holds acceptance criteria you agreed to. Reset: delete the file withrm docs/specs/<feature>.md, so that Day 4 starts with onlypriority.mdindocs/specs/. Check thatgit status --shortprints nothing.
A minute of reading, saved hours later
The real value of plan mode is not the plan. It is the moment you read "This is not urgent" and see that it returns "high", before any code commits you to that answer. You can accept the limit, change it, or write it into the spec as a known edge case. Each of those choices costs a minute in a plan.
The spec turns that minute into something durable. It sits in the repository, one committed file, ready for a fresh session or a teammate to build from. And git, not Claude's reply, tells you that nothing else changed.
Read the plan first. A plan costs a minute to read and nothing to throw away.
This is Part 3 of "Claude Code, Day-to-Day (second edition)," a day-by-day guide to Claude Code in which each day takes 20 to 40 minutes. Part 3 is Day 3. All 28 days are out now.