
One Character Decides What Your Coding Agent Reads
In the Pi coding agent, one character before Enter decides whether a shell command's output feeds the model or stays with you, and a tested experiment proves the model answers differently depending on which prefix you typed.
In the Pi coding agent, ! and !! both run a shell command, but only one of them hands the output to the model. Picking the right one is the cheapest context management you will ever do.
You ran the tests to check the agent's work, and that one habitual check quietly doubled the log in its context window, so ten minutes later your morning's decisions are competing with eight hundred lines that only say fine.
In this article: Day 4 of a day-by-day guide to Pi. Start here: you run shell commands from Pi's editor with
!and!!, prove with the model's own answers which prefix feeds it the output, and commit the damage rule. Going deeper: a one-question rule for choosing the prefix, what@really does in the editor and on the command line, and why your zsh aliases vanish inside Pi.
Tested on Pi 1.5.2.
Part 3 ended with the damage rule and its two tests uncommitted, five tests passing, and the crushed-mug session holding the work.
Start here
By the end of today you can run a shell command from Pi's editor with or without the model seeing its output, you have proved the difference with the model's own answers, and the damage rule is committed.
Starting fresh or fell behind? Run git switch -C main pi/day-03. This replaces your main with the end of Day 3; to keep your own work, run git branch my-backup first.
Check where you start
Start in the project folder. The tree is not clean today: it holds the change from Part 3.
cd ~/code/ticket-triage
git status --short
npm test
git status --short prints M src/classify.js and M test/classify.test.js, and npm test ends with tests 5, pass 5, and fail 0.
Two prefixes
Reopen the work session.
pi --continue
The footer ends with • crushed-mug. In Pi's editor, a line that starts with ! or !! is a shell command, not a prompt. Pi runs it in Bash, in the project folder, and shows the output in the transcript. The prefix decides who else sees it:
!commandruns the command, and Pi sends its output to the model with your next prompt.!!commandruns the command, and the output is for you only. The model never sees it.
Ask one question before you press Enter: does the model need to read this output to do its next job? A green test run tells the model nothing it can act on, and in a real project it can run to hundreds of lines. With !, those lines would go to the model on every later request in this session.
See green for yourself with !!
Check the suite for yourself, without telling the model.
!!npm test
The output scrolls by in the transcript. Node's test runner lists each test, and the end of the run should report every test passing, including the two Part 3 added: pass 5 and fail 0. The model saw none of it.
Break one test on purpose
To see the difference, you need output that matters. Change the expected value in the other test from "other" to "shipping", so that one test fails. perl -pi -e edits the file in place; you can also make the change by hand in your editor. The !! prefix runs it without telling the model.
!!perl -pi -e 's/"Hello"\), "other"/"Hello"), "shipping"/' test/classify.test.js
The command prints nothing. Run the suite again, still for yourself.
!!npm test
This time the output shows a failure. Near the end it reads expected: 'shipping', actual: 'other', and (exit 1). You know what broke, and the model does not, because !! kept the failure out.
Ask the model what it saw
Prove it. Ask the model about the tests, and forbid it to look for itself.
Is any test failing right now? Do not run any command or read any file. Answer in one sentence.
In this guide's test run the model answered: "No, the last npm test run passed all 5 tests and nothing has changed since then." Your wording may differ; any answer that does not name the failing test, including "I cannot tell," shows the same thing. The answer is wrong, and it is wrong for the right reason. The last run the model saw was its own, in Part 3. Your !! runs never reached it.
Now run the same suite with one !, and ask the same question again.
!npm test
The output sits in the transcript and waits for your next prompt. Ask the same question.
Is any test failing right now? Do not run any command or read any file. Answer in one sentence.
This time the model answered: "Yes, the "other" test at test/classify.test.js:8 now fails because it expects 'shipping' but gets 'other', which means that test was changed after my last run and my earlier "no" was out of date." The ! output went to the model with your question.
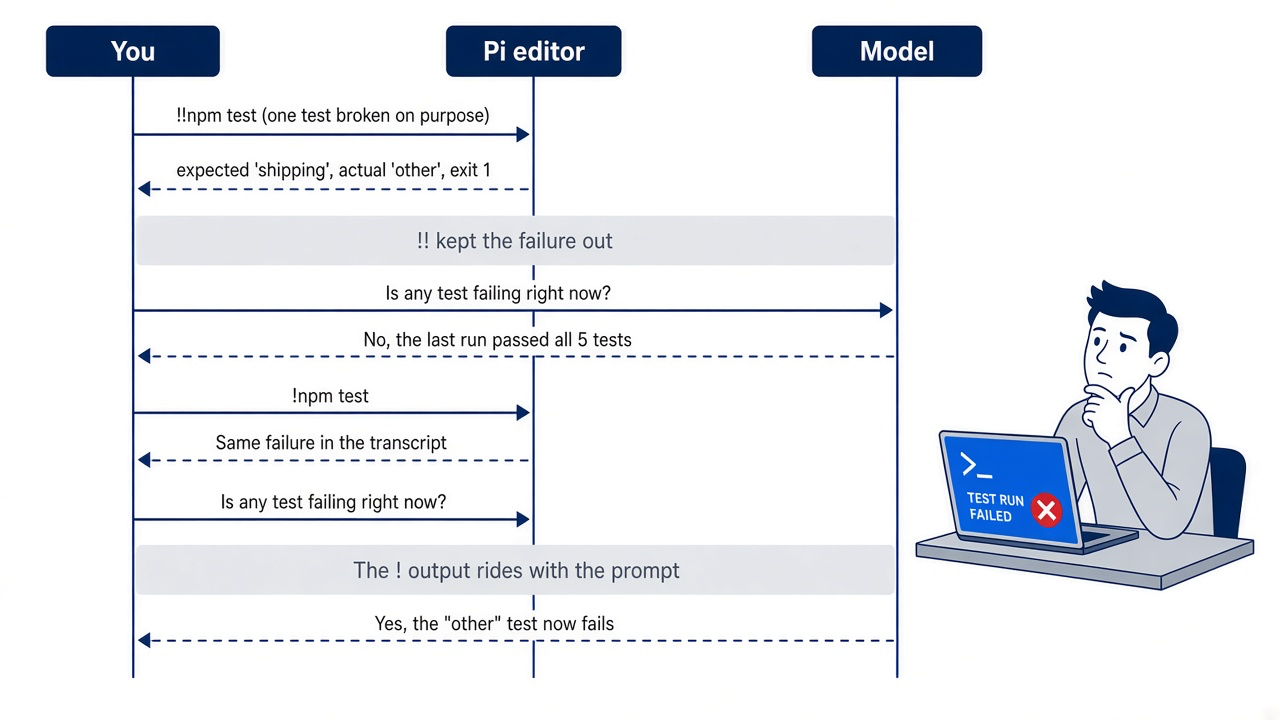
The scene captures the moment the experiment is built for. The failure is on your screen, the model insists nothing is wrong, and both facts are true at once because the prefix decided what each of you could see.
Point the model at one file with @
Now write that prompt. Name the test file with @ so the model reads the current file rather than its memory of the version it edited, and say what the model must not touch. Type @ in the editor to search for a file by name, and press Tab to complete the path. Type the start of this prompt, then press Tab after @test/cl:
Read @test/cl
The editor completes it to Read @test/classify.test.js, with a space after it. Finish the prompt and press Enter:
Read @test/classify.test.js and fix the wrong expectation in the "other" test, not the code. Then run npm test.
Commit with !!
The commit is for you, not for the model, so use !!.
!!git add -A && git commit -q -m "Add the damage rule" && git log --oneline -1
-q keeps git commit quiet, and git log --oneline -1 prints the commit it made. The output is one line: the new commit and Add the damage rule. Type /quit and press Enter.
Check the result
Check the tree and the tests from the shell.
git status --short
npm test
git status --short prints nothing, and npm test ends with tests 5, pass 5, and fail 0. This result is today's win: the damage rule is committed with its tests, and you saw the model answer "No" after !! and "Yes" after ! about the same failure.
You can stop here. Going deeper explains why this works and where it breaks.
Going deeper
This section is for readers who want the mechanism behind the two prefixes, a rule for choosing between them, the truth about @, the shell Pi runs, and what replaces a Claude Code subagent. It assumes you finished Start here in this part and in every earlier part.
The check that doubled the log
Picture Part 3 done with one clean prompt in the crushed-mug session: keep the chain of checks in src/classify.js unchanged, add the damage check in src/classify.js, add two tests to test/classify.test.js, and run npm test. The run finishes. Pi's summary says the classifier now spots the damage words and the tests pass. Part 1 set the rule that "done" means the command actually ran, so you check for yourself. Your Claude Code habit types the check for you.
!npm test
The suite is green. In a real project it is also four hundred lines of passing output, every line of which now waits to join the active branch. The model already has its own copy from the npm test it ran a minute ago, so the window now holds the same green suite twice. Ten minutes later, when you ask Pi to handle a refund ticket phrased a new way, the morning's decisions compete with eight hundred lines that say nothing except "fine."
Nothing about that check was wrong except the prefix. Pi gives you two of them: one that sends a command's output to the model and one that keeps it for you alone. This part teaches when to use each and works both on Ticket Triage with npm test. It adds @path as the precise way to name one file, explains why your zsh aliases vanish the first time Pi runs a command, and answers the question every Claude Code user asks next: where did the subagents go?
Where shell output goes
A ! command's output reaches the model with your next prompt; a !! command's output never does.
Pi's usage guide states the split in two lines. Prefix a command with ! to run it and include its output in the conversation. Use !! when you want to run a command without sending its output to the model.
!git status --short
!!npm test
Both lines run in the shell, and you see both outputs in the transcript. Only the first becomes model input.
The message-type reference explains the mechanism. A command you type with either prefix creates a bashExecution message that records the command, its output, and its exit code. It is not an LLM tool result. Unless the message is marked excludeFromContext, Pi converts it to user-role text before the next model request. The !! prefix sets that mark. The RPC reference adds two consequences that apply to your editor commands too. Output from ! reaches the model on the next prompt, not at the moment the command finishes. Also, several commands can run before a prompt; Pi includes each output that is not excluded.
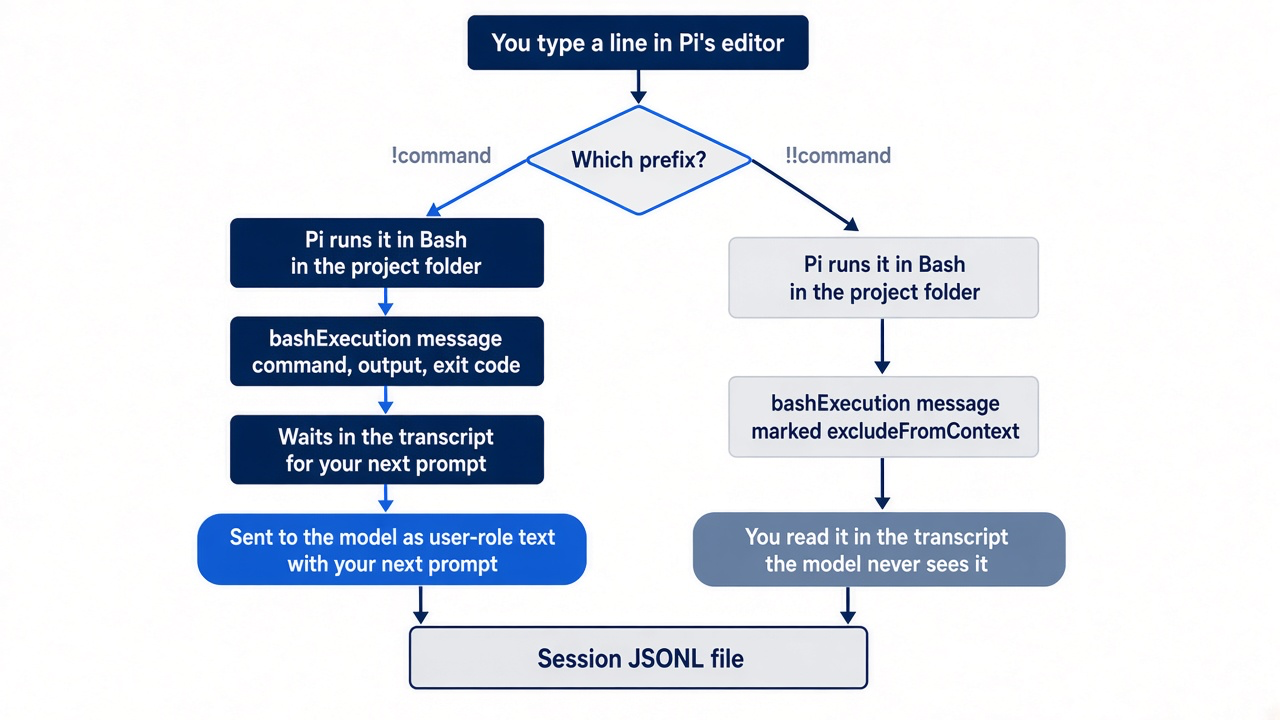
The first consequence shapes how you work. A ! command does not start a turn. It loads the next one. You run !npm test, see the failure, and then type the prompt that tells the model what to do with it. The output and your instruction arrive together.
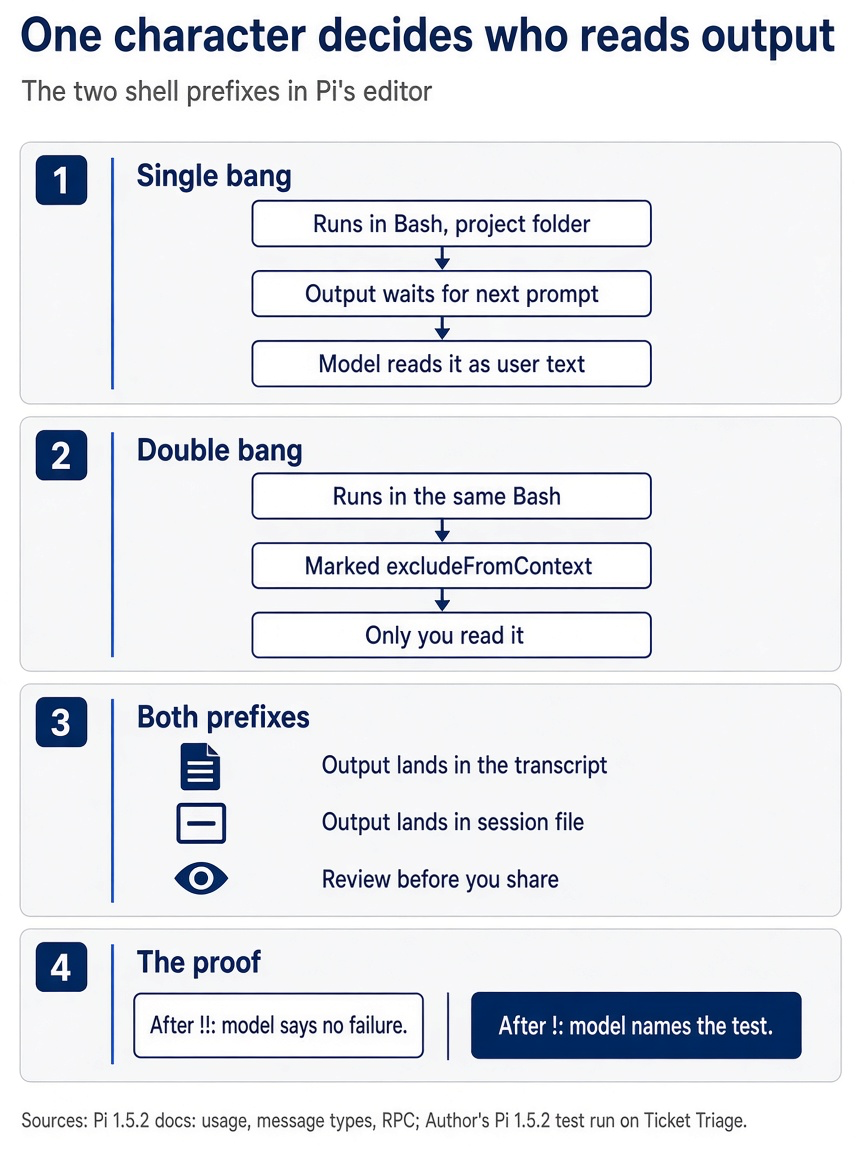
The single-bang prefix runs the command and queues its output as user text for the next request. The double-bang prefix runs it in the same Bash but marks it so the model never reads it. Both kinds of output still land in the transcript and the session file, and the tested proof shows the model's answer changing with the prefix.
Gotcha: the footer does not move when you run a ! command. In an earlier test run of this guide, four !npm test runs left the footer at 0.6%, and it moved to 0.7% only after the next prompt sent their output to the model. On a window of one million tokens, a short test log moves the number by about a tenth of a percent. The model's answer, as in Start here, is the reliable proof.
Gotcha: !! keeps output out of the model's context, not out of the session file. The RPC reference describes excluded output as stored in the session but omitted from the model context. If a !!env prints a token, the token is in the JSONL file, and /export or /share can carry it out. Pi's usage guide already warns to review a session before sharing it; !! does not change that.
Choose the prefix before you press Enter
Ask one question: does the model need to read this output to do its next job?
The answer is no more often than a Claude Code habit suggests. Most commands you run mid-session are for you: proof that something passed, a glance at the tree, a log you want to scroll. One table sorts the commands a Ticket Triage afternoon actually involves.
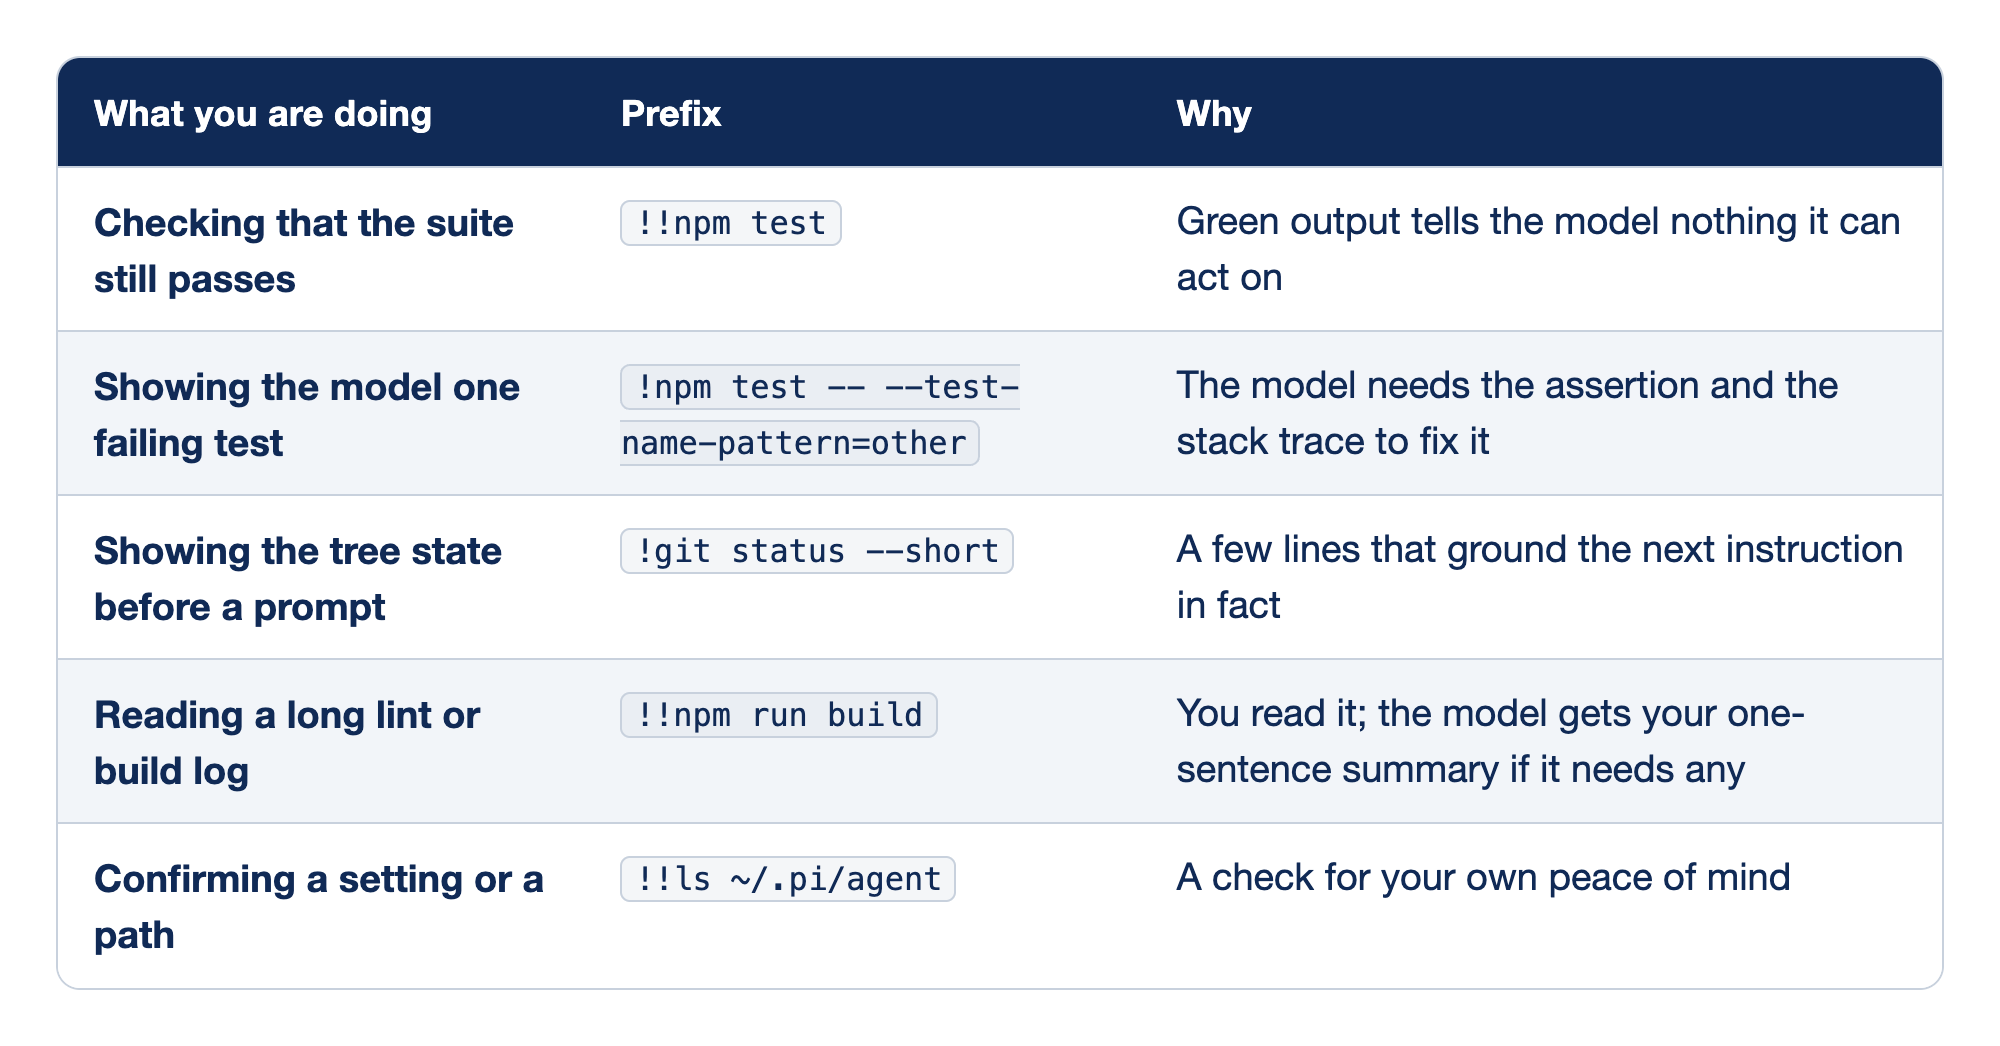
Five common Ticket Triage commands sort by who needs their output. The "What you are doing" column names the task, the "Prefix" column gives the exact line you type in Pi's editor, and the "Why" column says who reads the result.
- Checking that the suite still passes takes
!!npm test, because green output gives the model nothing to act on. - Showing the model one failing test takes
!npm test -- --test-name-pattern=other, because the model needs the assertion and the stack trace to fix it. - Showing the tree state before a prompt takes
!git status --short, because a few lines ground the next instruction in fact. - Reading a long lint or build log takes
!!npm run build, because you read the log and the model gets your one-sentence summary if it needs one. - Confirming a setting or a path takes
!!ls ~/.pi/agent, because the check is for your own peace of mind.
The rows split by audience. If the output is evidence the model must reason about, use ! and keep it narrow. If it is evidence for you, use !!, and tell the model the conclusion in a sentence when it matters.
- Checking that the suite passes. A green run carries no information beyond "green," and you can say that in one word if the model needs to know. Hundreds of lines of passing output are the most common way a Pi window fills with nothing.
- Showing one failing test. In this case the output is the point, and paraphrasing it loses the exact assertion. Narrow the command first, so the model reads the failing test's results rather than the whole suite. With Node's built-in runner,
--test-name-patternruns only the tests whose name matches; in this guide's test run,npm test -- --test-name-pattern=otherrantests 1. - Tree state before a prompt.
git status --shortis a handful of lines, and it stops the model from guessing which files changed. It is the cheapest!you will run all day. - A long lint or build log. A build log can run to thousands of lines, and most of it is progress noise. Read it with
!!, find the one error, and quote that line in your prompt. Ticket Triage has no build step; the row is for your own projects. - Confirming a setting or a path. Checks like this answer your question, not the model's. Keep them out.
When you are unsure, start with !!. You cannot promote a !! result later, so if the model turns out to need it, you run the command again with !, scoped tighter. One rerun costs seconds; a duplicate test log costs context on every later request until Part 7's compaction.
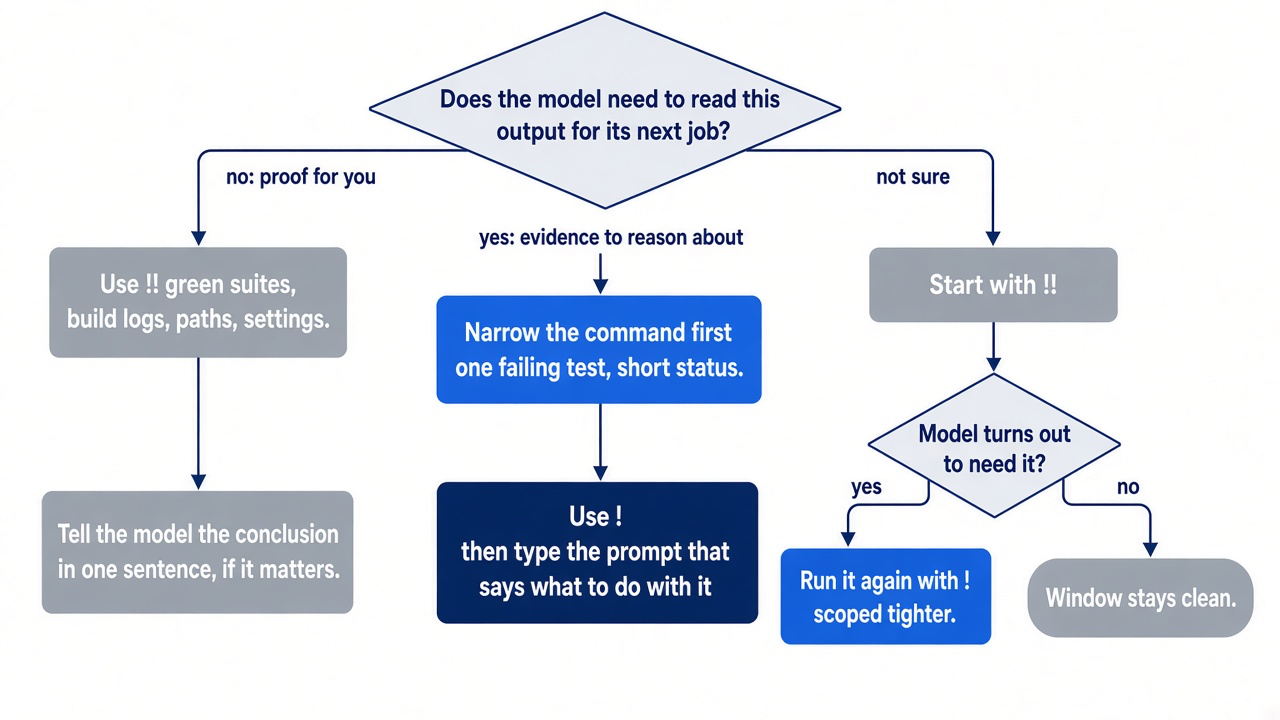
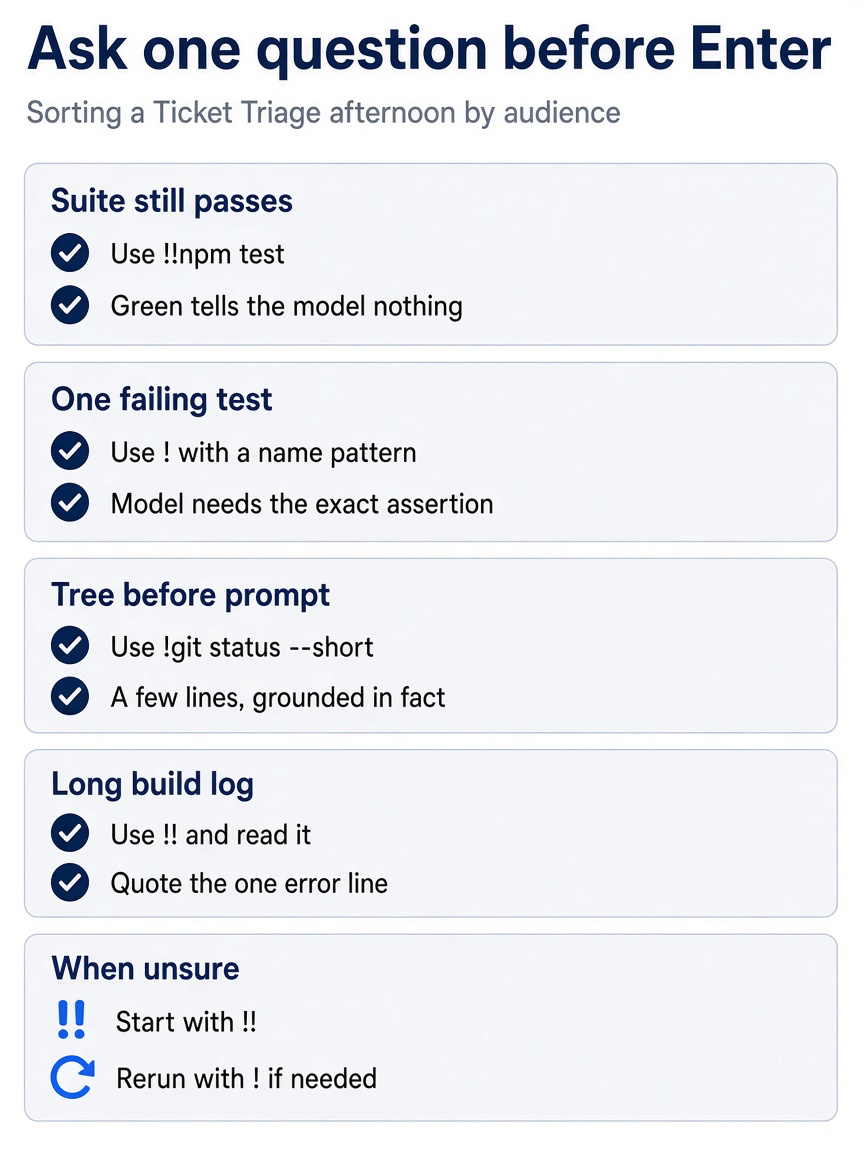
Green suites and long build logs go to !!, a single failing test and the pre-prompt tree status go to !, and the fallback for doubt is !! followed by a narrower rerun with !.
If you already use Claude Code: Claude Code's ! bash mode runs the command and includes both the command and its output in the next message. Pi's ! is the same move. Pi adds !!, the version for output you only need to see, and it is the one you will type most.
Ticket Triage: green with !!, red with !
The walkthrough runs both prefixes on the same suite, so you can watch the window grow only when it should. Start here did it with a broken test. This walkthrough does it with a new ticket. It was not run for this guide.
Start pi --no-session from today's end state: the damage rule committed, the two new tests from Part 3 in test/classify.test.js, and five tests passing. Glance at the footer and note the context number. Then check the suite for yourself, without telling the model.
!!npm test
Your test runner's format is the one from Start here, and the end of the run should report every test passing, including the two Part 3 added.
Now add the case Part 3 did not cover. The series' change says a crushed mug is refund when the customer asks for money back, and customers rarely use the word "refund." In your editor, outside Pi, add a third test to test/classify.test.js for this ticket.
The mug arrived broken. I want a full reimbursement.
The test expects refund. Run the suite again, still for yourself.
!!npm test
One test fails: the new ticket comes back as shipping, because "broken" matches the damage check and nothing matches the refund check. You know what broke, and the model does not, because !! kept the failure out. Run the narrow version with ! so the model gets exactly the failing file's results.
!npm test -- --test-name-pattern=reimbursement
The -- tells npm to pass --test-name-pattern=reimbursement through to the test script. Most test runners take a filter like this, but check what yours does with it. The point is to send the model one test's results, not the suite's. With Node's built-in runner, the pattern matches test names, so name the new test with the word reimbursement. The output sits in the transcript and waits for your next prompt.
Now write that prompt. Name the classifier with @ so the model reads the current file rather than its memory of the version it edited, and put the constraint first, the way Part 3 taught.
Keep the chain of checks in src/classify.js. The failing test above shows that "I want a full reimbursement" returns shipping instead of refund. Fix it in @src/classify.js only, then run npm test -- --test-name-pattern=reimbursement.
Pi reads the failure, then the file, edits the classifier, and runs the narrowed test through its own bash tool. When the run ends, confirm the whole suite and any other checks yourself, out of the window.
!!npm test
It should pass. Check the tree from Pi's editor, this time with !, because the model should know the state you are about to commit.
!git status --short
The expected result is two modified files and nothing else.
 M src/classify.js
 M test/classify.test.js
Look at the footer again. The context number grew by one narrowed test run, one file, one status listing, and the model's own work. It did not grow by three full suites.
Reset when you are done, so the next part starts from a clean tree. The second command prints nothing. This reset was not run for this guide.
git checkout -- src test
git status --short
Gotcha: !! governs only the commands you type. When the model calls its bash tool, the result is a tool result, and every tool result goes back to the model as part of the turn. Asking Pi to "run npm test" puts the output in the window, up to the 2000 lines or 50KB the model sees, no matter which prefix you use for your own checks. Ask for the narrowed command, as the prompt above does, or run the full suite yourself with !!.
What @ does, in the editor and on the command line
`@` in Pi's editor names a file; it does not paste the file. On the command line, `@path` does paste it. `@` is precise, not free.Pi's usage guide gives you two keys for it. Type @ to search for a file and add it to your prompt. Press Tab to complete a path you have started. Both search from the working folder, which is why Part 2 made you start Pi inside Ticket Triage. A session started in $HOME searches your whole home directory.
In this guide's tests, "add it to your prompt" meant the path, not the contents. A pi --no-session session got How many tests does @test/classify.test.js define? Do not use any tool. Answer with one number., once typed in full and once picked from the @ list with Tab. Both times the model answered that the file's contents were not in the conversation. With tools allowed, the model reads the named file with its read tool, as it did in Start here.
The difference from "explain how the classifier finds the damage words" is still control. Without the @, the model decides what to read, and it may read src/classify.js and the test file to be thorough. With it, you name the one file the question is about.
Explain how @src/classify.js finds the damage words, in three sentences.
This prompt was not run for this guide.
The same syntax works on the command line, and there it does more. The CLI reference lists @path as a way to "include a text file or image in the first prompt," resolved from the current working directory.
cd ~/code/ticket-triage
pi --no-session --tools read -p @test/classify.test.js "How many tests does this file define? Do not use any tool. Answer with one number."
In the test run the answer was 5, with no tool call. With @ on the command line, the file arrives in your message, and the model has what it needs without a single read call. The answer prints to your terminal, and nothing joins the crushed-mug session.
A file costs context either way, whether the model reads it or @ on the command line attaches it. A whole file costs its full size on every later request in the branch. Name the file the question is about, not the directory around it.
For the screen itself, Ctrl+O expands or collapses tool output in the transcript. Collapse a long tool result when it gets in the way of reading the conversation. It changes the display, not what the model already received. Ctrl+O was not run for this guide.
If you already use Claude Code: Claude Code's docs say @ includes files "without waiting for Claude to read them." In Pi's editor, @ adds the path, and the model still makes the read call. Use pi -p @file when you want the contents attached.
Why your zsh aliases vanish
Pi runs every command in a fresh, non-interactive Bash, so nothing your ~/.zshrc defines exists there.
On a MacBook Pro your terminal runs zsh, and years of ~/.zshrc give you shortcuts such as gst for git status --short. Type one into Pi, and it fails. Use a pi --no-session session for this test, so it saves nothing.
!!gst
Bash reports that it cannot find gst, something like the line below. In this guide's test run it printed:
 /bin/bash: gst: command not found
 (exit 127)
Gotcha: pick alias names that are not already programs. In the same test, !!gs did not fail: Homebrew's Ghostscript is named gs, it started, and it waited for input until Escape stopped it.
Pi's shell page explains why. Pi starts a separate non-interactive shell process for each Bash command, normally with bash -c. Non-interactive Bash does not expand aliases by default, and it usually does not load the same startup files as an interactive terminal. On macOS and Linux, Pi looks for /bin/bash, then bash on PATH, and falls back to sh when Bash is unavailable. Your zsh configuration is never in the picture. The same page lists which shell runs each kind of command.
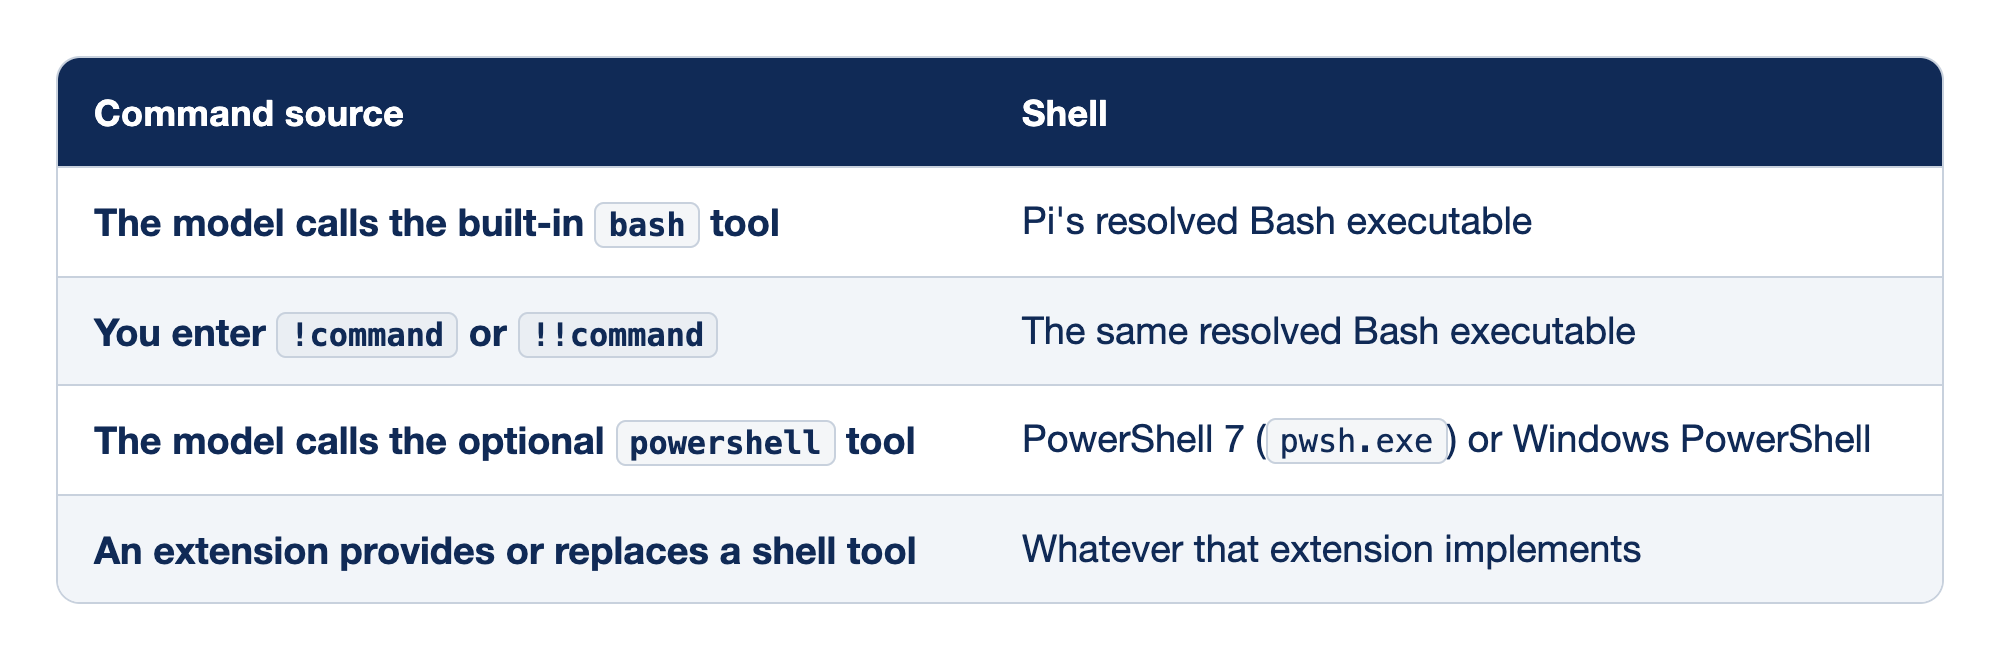
Each source of a shell command maps to the executable that runs it. The "Command source" column names who issued the command, and the "Shell" column names the shell Pi uses for it.
- When the model calls the built-in
bashtool, Pi runs the command in its resolved Bash executable. - When you enter
!commandor!!command, Pi runs it in the same resolved Bash executable. - When the model calls the optional
powershelltool, the command runs in PowerShell 7 (pwsh.exe) or Windows PowerShell. - When an extension provides or replaces a shell tool, the command runs in whatever shell that extension implements.
The first two rows are the important pair: your commands and the model's commands run in the same Bash. Any fix you make for one applies to both.
- The model's
bashtool. It uses Pi's resolved Bash, the one found in the order above or set byshellPath. - Your
!and!!commands. They use that same executable, so if an alias works for you, it works for the model. - The
powershelltool. It exists only on native Windows, and only when you enable it; the next section covers it. - An extension's shell tool. An extension that replaces
bashcontrols its own setup, so Pi's shell settings may not reach it. Check that extension's documentation.
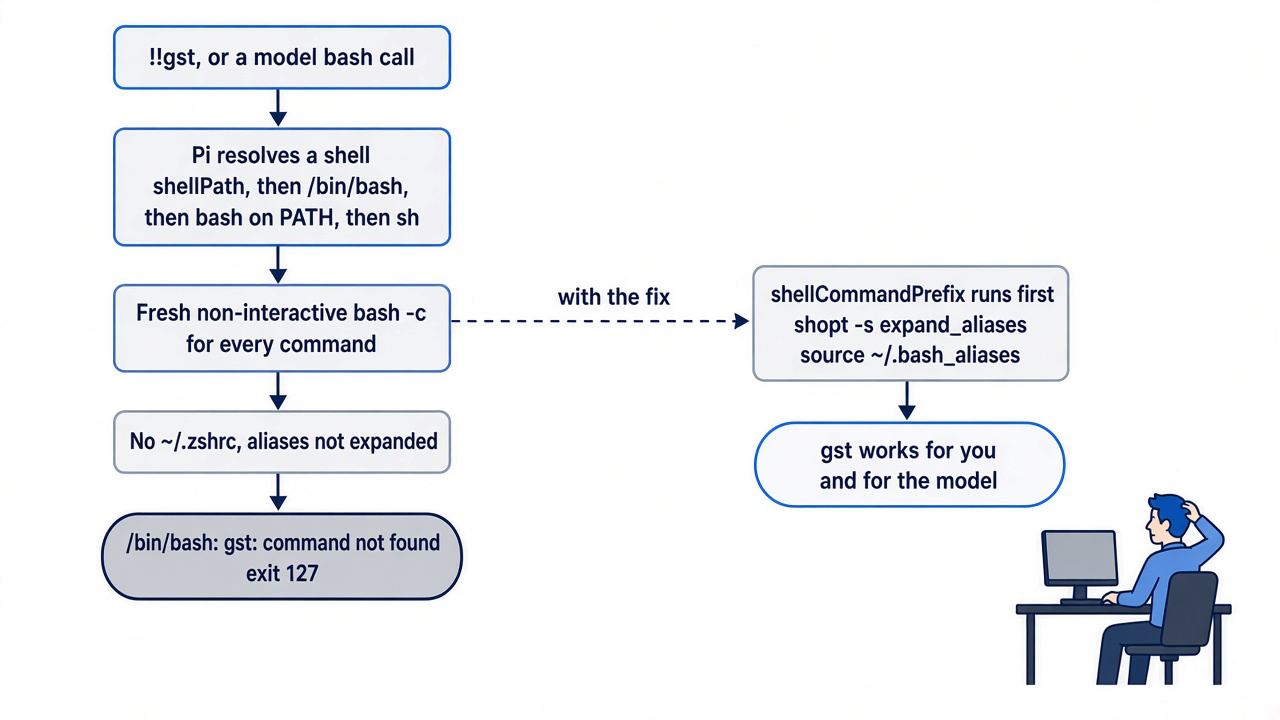
The documented fix has two parts. First, put the aliases Pi needs in a Bash-compatible file. Create ~/.bash_aliases with your shortcuts.
alias ll='ls -la'
alias gst='git status --short'
Second, tell Pi to enable alias expansion and load that file before every command. Add shellCommandPrefix to ~/.pi/agent/settings.json, alongside any keys already there.
{
  "shellCommandPrefix": "shopt -s expand_aliases\nsource ~/.bash_aliases"
}
The \n is a JSON newline. Pi joins the prefix and each command with a newline, so every command runs as three lines: enable aliases, load the file, run what you typed. Apply the change and test it from Pi's editor.
/reload
!!ll
The listing should match ls -la in Ticket Triage. Run !!gst as well; it should print the same lines as the status check above. On a clean tree, that is nothing. In this guide's test run, /reload printed Reloaded keybindings, extensions, skills, prompts, themes, and context files, !!ll listed the folder, and !!gst printed nothing. The test then removed the two changes again.
Copy only the aliases you want, not your shell configuration. Pi's docs say plainly not to source an arbitrary .zshrc into Bash, because zsh options, functions, and plugins may not parse or behave correctly there. Aliases must use Bash-compatible syntax, so translate any that lean on zsh-only features.
Gotcha: the prefix runs before every command, the model's included. Keep it fast and free of interactive prompts. A prefix that asks for input makes every command wait, and a slow one taxes every bash call the model makes.
Gotcha: if Pi reports that shopt is not found, Pi has fallen back to sh, or shellPath points to a shell that is not Bash. Install Bash or set shellPath to a Bash executable.
shellPath is the setting for a Bash that Pi does not find on its own, such as a newer Bash you installed yourself. It goes in the same settings file and supports a leading ~.
{
  "shellPath": "~/.local/bin/bash"
}
Run /reload after changing it. Most macOS readers never need it, because /bin/bash is where Pi looks first. shellPath was not run for this guide.
On native Windows, ! and !! still mean Bash
Switching the model to PowerShell changes the model's tool, never your prefixes.
Part 1 showed how native Windows can hand the model PowerShell instead of Bash. Pi's Windows page lays out the three command environments. The Windows steps in this section were not run for this guide.
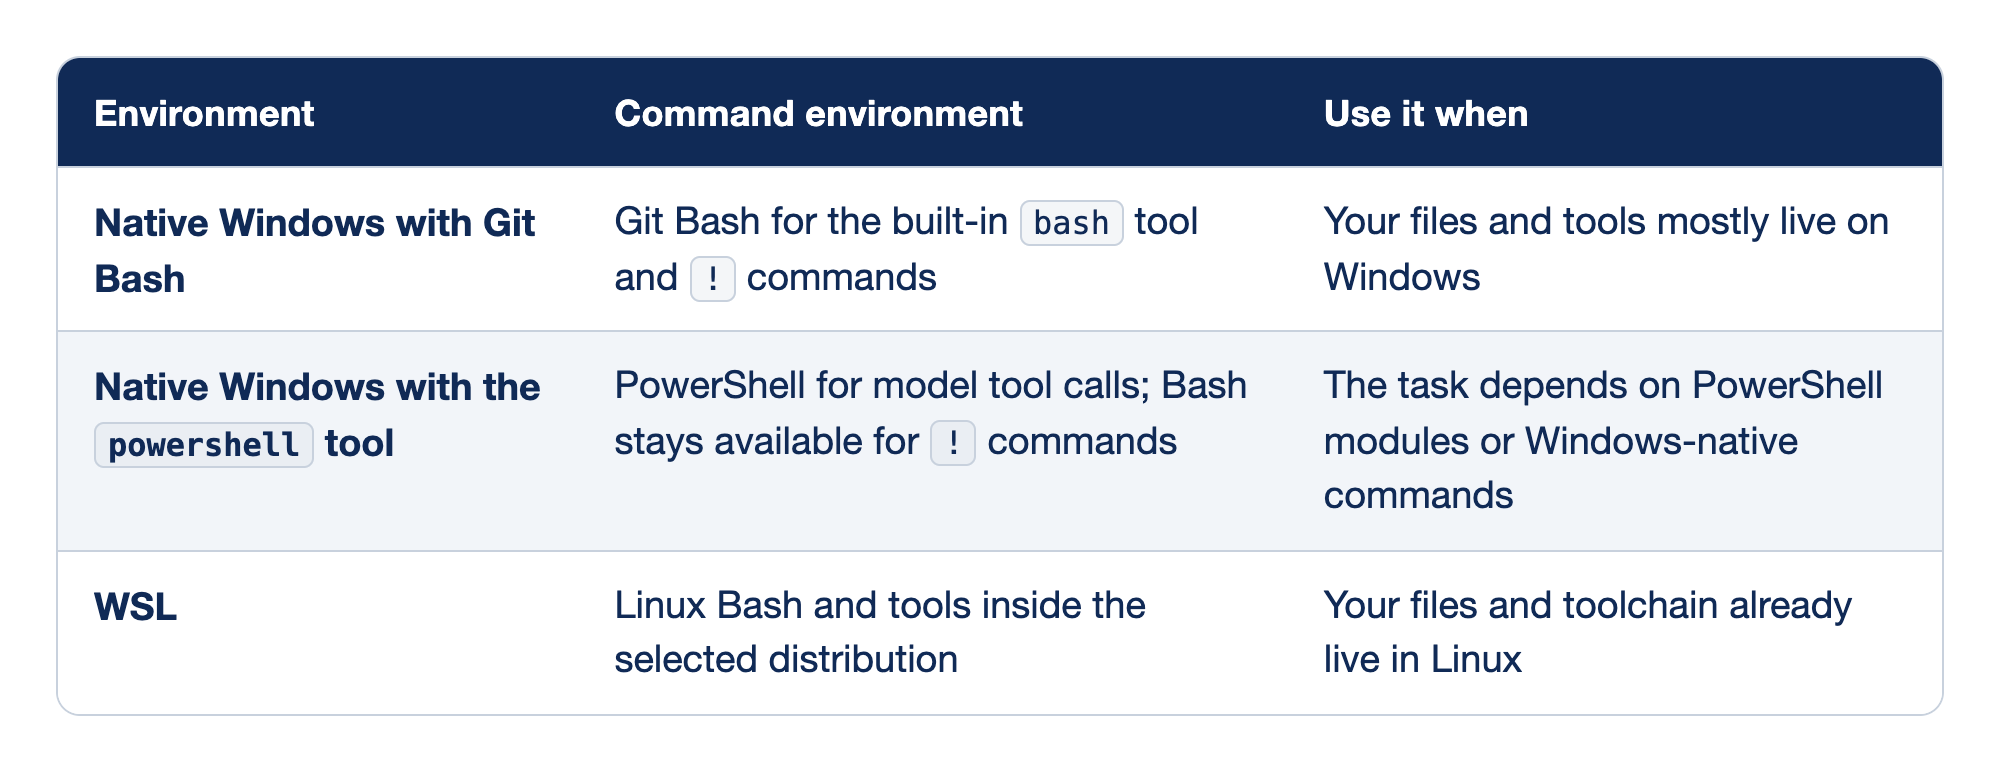
Pi on Windows offers three command environments, and each one suits a different setup. The "Environment" column names the setup, the "Command environment" column says which shell serves the model and your ! commands, and the "Use it when" column says when to pick it.
- Native Windows with Git Bash uses Git Bash for the built-in
bashtool and for!commands, and it fits when your files and tools mostly live on Windows. - Native Windows with the
powershelltool sends model tool calls to PowerShell while Bash stays available for!commands, and it fits when the task depends on PowerShell modules or Windows-native commands. - WSL uses Linux Bash and tools inside the selected distribution, and it fits when your files and toolchain already live in Linux.
Read the middle row carefully, because it is the one that surprises people. Swapping the model's tool leaves your own commands exactly where they were.
- Native Windows with Git Bash. Pi resolves Bash from
shellPath, then Git Bash under%ProgramFiles%or%ProgramFiles(x86)%, thenbash.exeonPATH. Both the model and your!commands use it, and Git for Windows is usually all you need.!printf 'Bash is working\n'confirms the shell. - Native Windows with the
powershelltool. Setting"defaultTools": ["read", "powershell", "edit", "write"]in~/.pi/agent/settings.jsonreplaces the model-facingbashtool withpowershell. The!and!!editor commands continue to use Bash. A!!Get-ChildItemgoes to Bash and fails there, while the model'sGet-ChildItemworks. - WSL. Pi runs as a Linux process and uses the distribution's Bash. The alias fix from the previous section applies unchanged.
Keep Git for Windows installed after the swap, because your ! commands still need Bash. Your aliases follow the same rule: ~/.bash_aliases and shellCommandPrefix serve your commands, while the model's powershell tool starts PowerShell with -NoProfile -NonInteractive -ExecutionPolicy Bypass.
What replaces a Claude Code subagent
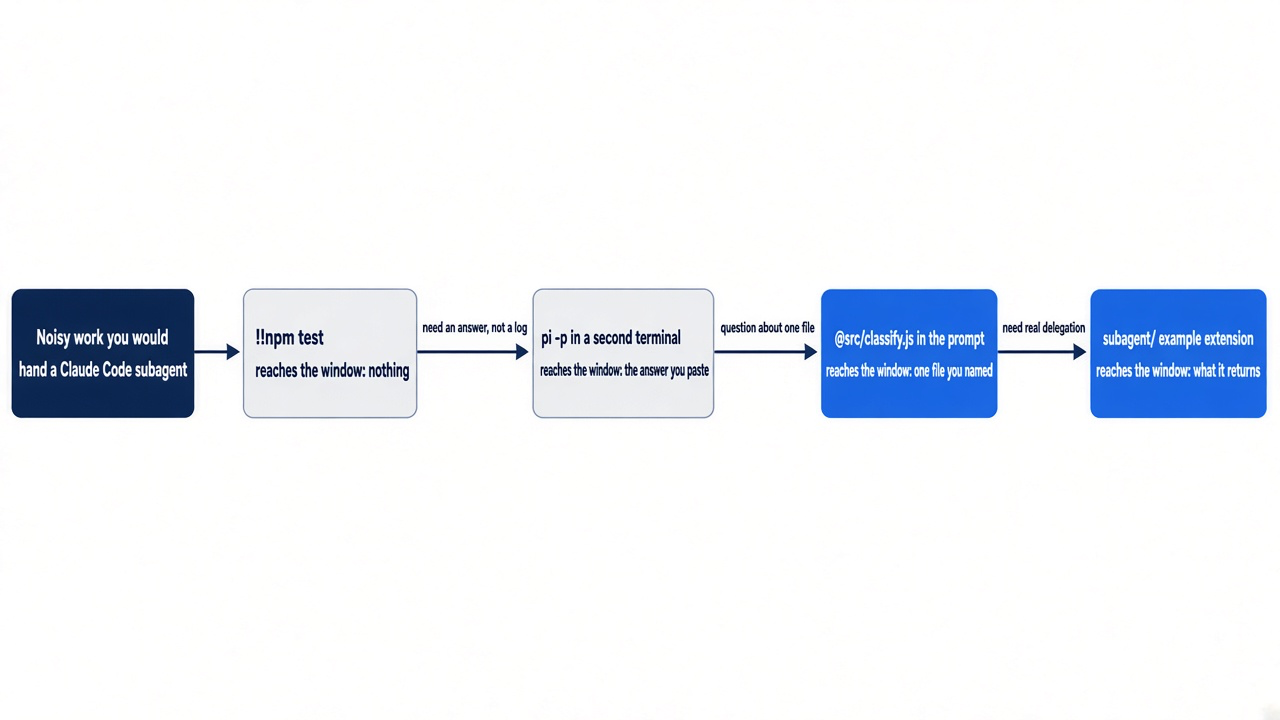
Pi has no built-in subagents, so the job of keeping noisy work out of the main thread falls to a few smaller tools.
In Claude Code, a subagent is a separate context window. It reads files and runs commands in its own context, and only its final summary returns to your conversation. Part 6 of the Claude Code guide gives the trigger: when the next step would add thousands of tokens of reading or logs to the main thread, delegate it. Pi ships nothing by that name. The table maps the habit to what Pi gives you.
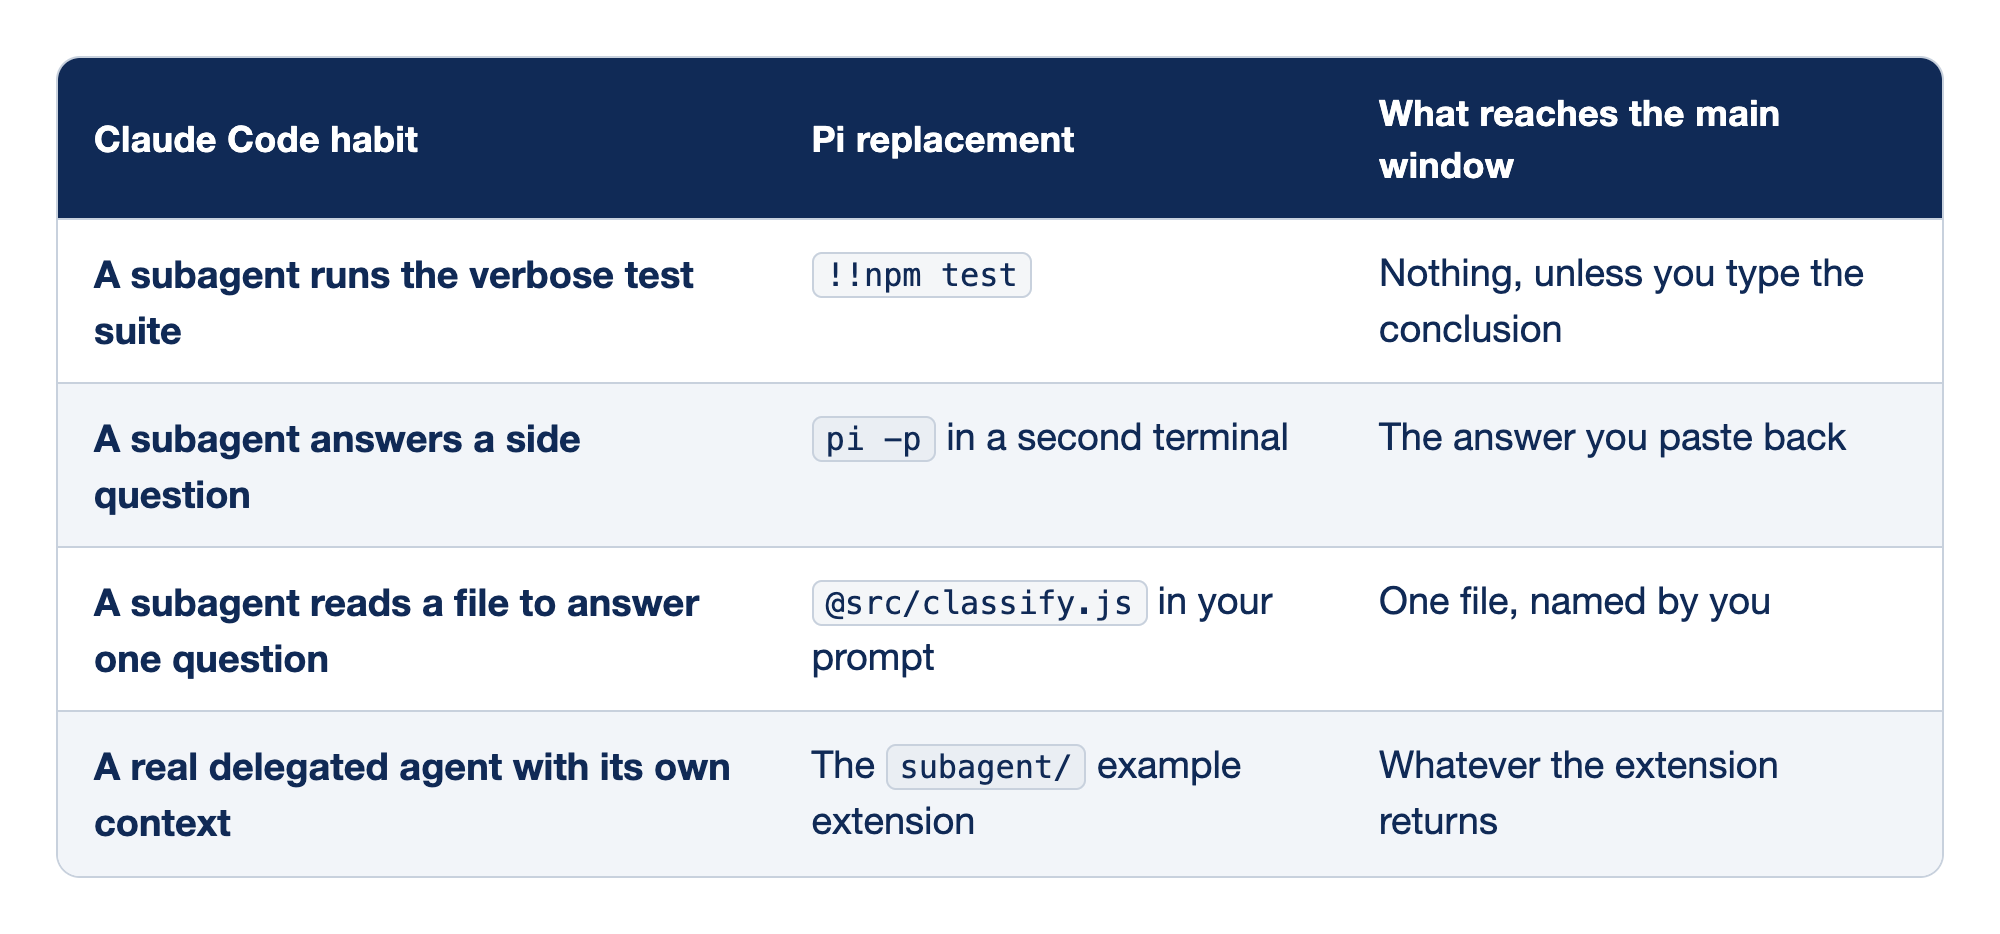
Each Claude Code subagent habit has a Pi replacement with a known cost to the main window. The "Claude Code habit" column names the job you used to delegate, the "Pi replacement" column names the tool that does it in Pi, and the "What reaches the main window" column says how much context you pay.
- A subagent that runs the verbose test suite becomes
!!npm test, and nothing reaches the main window unless you type the conclusion. - A subagent that answers a side question becomes
pi -pin a second terminal, and only the answer you paste back reaches the main window. - A subagent that reads a file to answer one question becomes
@src/classify.jsin your prompt, and one file, named by you, reaches the main window. - A real delegated agent with its own context becomes the
subagent/example extension, and whatever the extension returns reaches the main window.
The rows run from cheapest to most capable. Reach for the first one that fits.
!!for output you only need to see. The most common subagent job is "run the tests and tell me if they pass." With!!you run them yourself and read the answer. The model never pays for the log.pi -pfor a side question. Print mode runs a separate Pi with its own context, writes the final answer, and exits. Piped standard input is prepended to the prompt, so a long log goes into the throwaway window instead of yours. Only the answer you choose to paste back enters the session.@pathfor one file. When the question is about one file, name it. The model reads that one file without exploring around it.- The
subagent/extension. Pi's extension examples include asubagent/extension that delegates tasks to specialized subagents with isolated context windows. It is an example, not a built-in, and Part 9 shows where the examples live.
The side-question pattern is worth practicing, because it is the closest built-in match to a delegated read. From a second terminal in Ticket Triage, pipe the full suite into a print-mode Pi and give it read-only tools.
cd ~/code/ticket-triage
npm test 2>&1 | pi --no-session --tools read,grep,find,ls -p "Summarize any failing tests in two sentences, naming the test and the expected value."
The full log lands in the side Pi's window, which disappears when it exits. --tools read,grep,find,ls replaces the default built-in tools with a read-only allowlist, so the side agent can look at files but cannot edit them or run commands through Pi's own tools. A plain-name allowlist keeps MCP tools, so add --no-mcp if you have MCP servers configured. --no-session keeps the run out of your session picker, as in Part 2's side question. Paste the two sentences into the main session if the model needs them. In this guide's test run, on the passing suite, the side Pi answered that no tests failed and named all five. No session file was added.
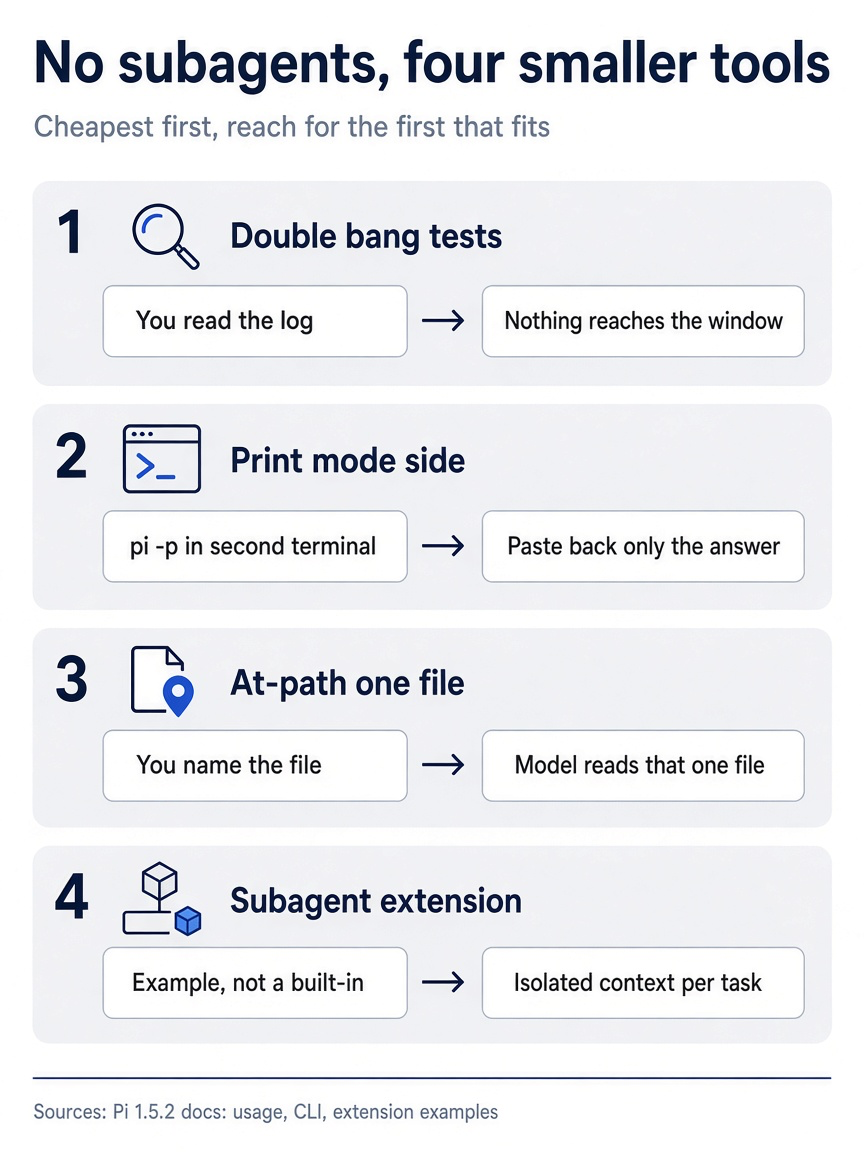
The four replacements form a ladder from cheapest to most capable: a !! test run, a print-mode side session, an @ file reference, and the subagent example extension. Their cost to the main window ranges from nothing for a !! run to whatever the extension returns, and the extension is an example rather than a built-in.
If you already use Claude Code: the difference is who decides. Claude Code delegates to Explore on its own when the work fits. Explore is Claude Code's built-in read-only subagent. In Pi you make the call at the keyboard, one prefix or one terminal at a time. It is more typing, and you always know what entered the window.
The shell has one more lever, for later. Pi's extension API fires a user_bash event whenever you run a ! or !! command, and an extension can intercept it: route the command over SSH, wrap it in setup, or return a result directly. The event even reports whether the command used !!. The interactive-shell.ts example uses it to run full-screen programs such as vim and htop with the full terminal, which Pi's non-interactive shell is not built for. Part 9 builds your first extension.
Do this today
Everyone
-
Run the suite both ways and ask between them. Run
pi --continue. The footer ends with• crushed-mug. In that session, run!!npm test, ask the model whether any test failed without running a command, then run!npm testand ask again. Both answers say no test fails; after!, the model refers to your run.!!npm test !npm test -
Make
!git status --shortyour pre-prompt habit. Run it before any prompt that changes files, so the model starts from the tree, not a guess. On today's tree it prints nothing.!git status --short -
Check the tree. Type
/quit, then run this. The command prints nothing.git status --short
If you read Going deeper
-
Port the aliases you actually use. Copy them into
~/.bash_aliasesin Bash syntax, add the prefix to~/.pi/agent/settings.json, and verify.!!llprints the folder listing.{ "shellCommandPrefix": "shopt -s expand_aliases\nsource ~/.bash_aliases" }/reload !!ll -
Attach a file on the command line. The answer is
5, and no tool runs.pi --no-session --tools read -p @test/classify.test.js "How many tests does this file define? Do not use any tool. Answer with one number." -
Watch the footer, and know its limit. In a Pi session in your own repository, note the footer's context number, run the suite with
!!, send a one-line prompt, and note the number again. Then do the same with!and compare the growth. On a large context window the difference after one short test log can be a tenth of a percent. This step was not run for this guide. -
Ask one side question out of the window. Pipe a long log into a read-only print-mode Pi from a second terminal, and paste back only the answer. On today's suite, the answer says that no tests failed.
npm test 2>&1 | pi --no-session --tools read,grep,find,ls -p "Summarize any failures in two sentences."
The cheapest context you will ever save
Context management usually sounds like heavy machinery: compaction, branching, subagents, careful prompts. In Pi, the first and cheapest layer is a single character. Every shell command you type either becomes model input or stays with you, and you decide which before you press Enter.
The experiment makes the point concrete. The same failing test produced "No" after !! and "Yes" after !, because the model reasons only from what reached it. Your tests, your build logs, and your commits mostly belong to you. Send the model the narrow slice it needs to act, and keep the rest on your side of the glass.
The model was never careless about your test run. It simply never saw it, because you chose not to show it.
This is Part 4 of "Pi, Day to Day," a 12-part guide to running the Pi terminal coding agent with the same daily discipline you already bring to Claude Code.